This content is restricted.
Linking from Email or Facebook to an Event
Getting our events into the hands of the public is quite important so as to maximize interest and attendance, so it is important that we use the correct URLs that expose only our public-facing posts and pages.
In the case of events, this means directing people only to the Events page or to a specific event on the Events page. This is the only public-facing page related to events on our website. The individual event posts are part of the editing process and should not be exposed to the public.
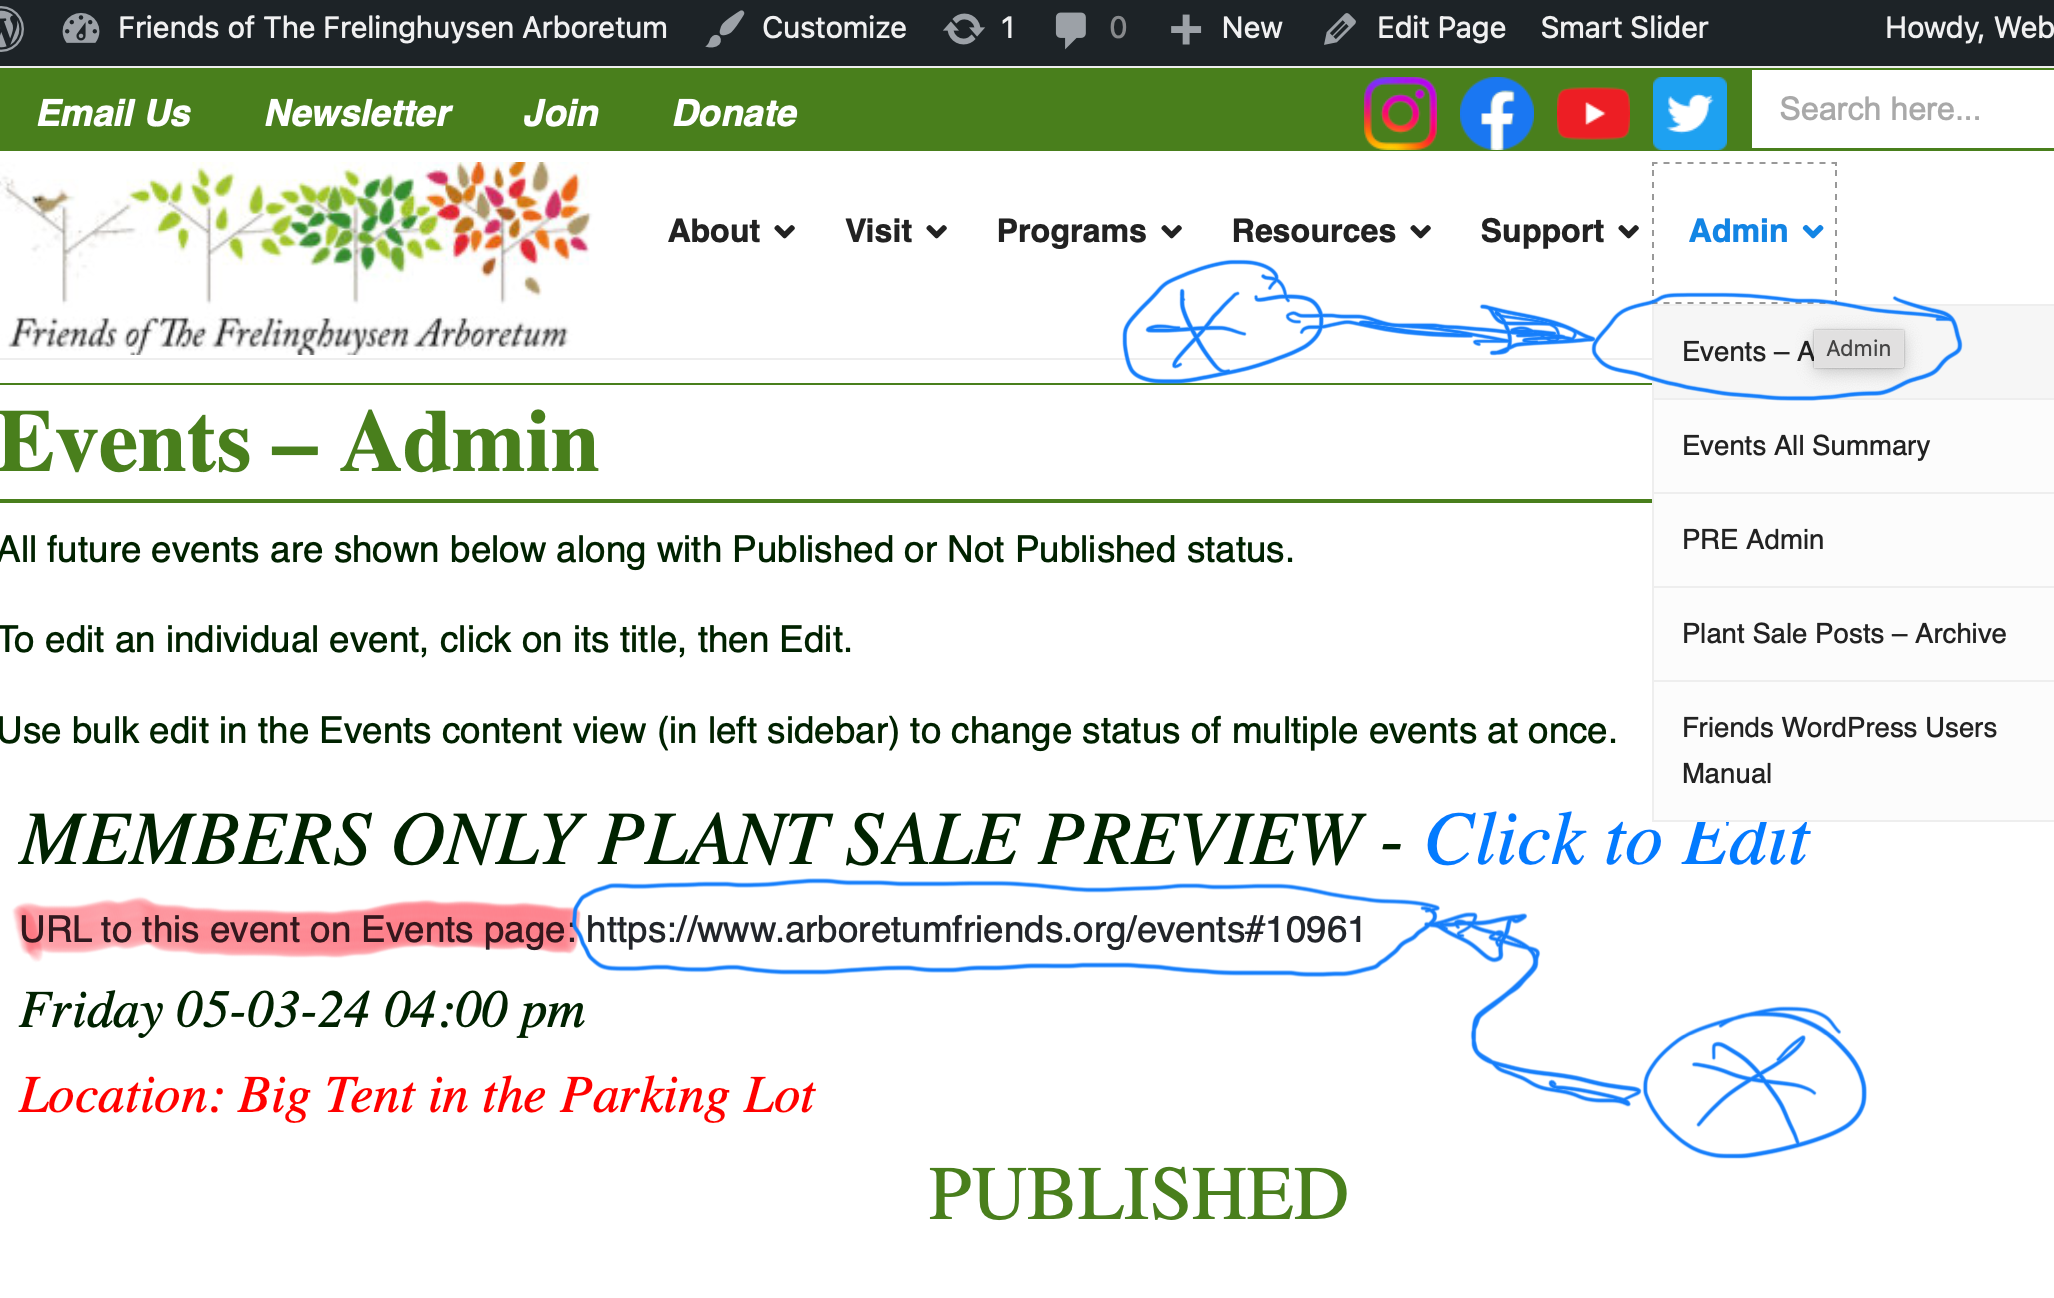
The Events page URL, of course, is https://www.arboretumfriends.org/events/ which opens at the top of the page. We can, however, open that same page scrolled down to a specific event by using a URL of the form https://www.arboretumfriends.org/events#11314 where the #11314 tells the browser to scroll the page down to that specific event.
To find the URL to use in public links, follow these steps:
- While logged in, navigate in the Top Menu to Admin | Admin – Events. This opens a page that looks very similar to the regular Events page, but has additional information on it.
- Scroll down to the specific event and find the URL in the line immediately beneath the event’s title.
- Copy the URL to your clipboard.
- Paste this URL into your email, Blast entry or Facebook post.
Then when the recipient of the email clicks the link, they will open the proper, public-facing information.
Add Posts to the Plant Sale Page
The Plant Sale page (https://www.arboretumfriends.org/plant-sale-2024/) has two sections, several paragraphs of static text and banner at the top, followed by a dynamic area that automatically displays posts (like blog entries) that are tagged for the Plant Sale page. This manual page will focus on adding posts that will be displayed at the bottom of the Plant Sale page. Other manual pages provide additional information about the Block Editor, Images and the Media Library, and Images and Galleries in Posts. All the manual entries me be viewed here.
Dashboard
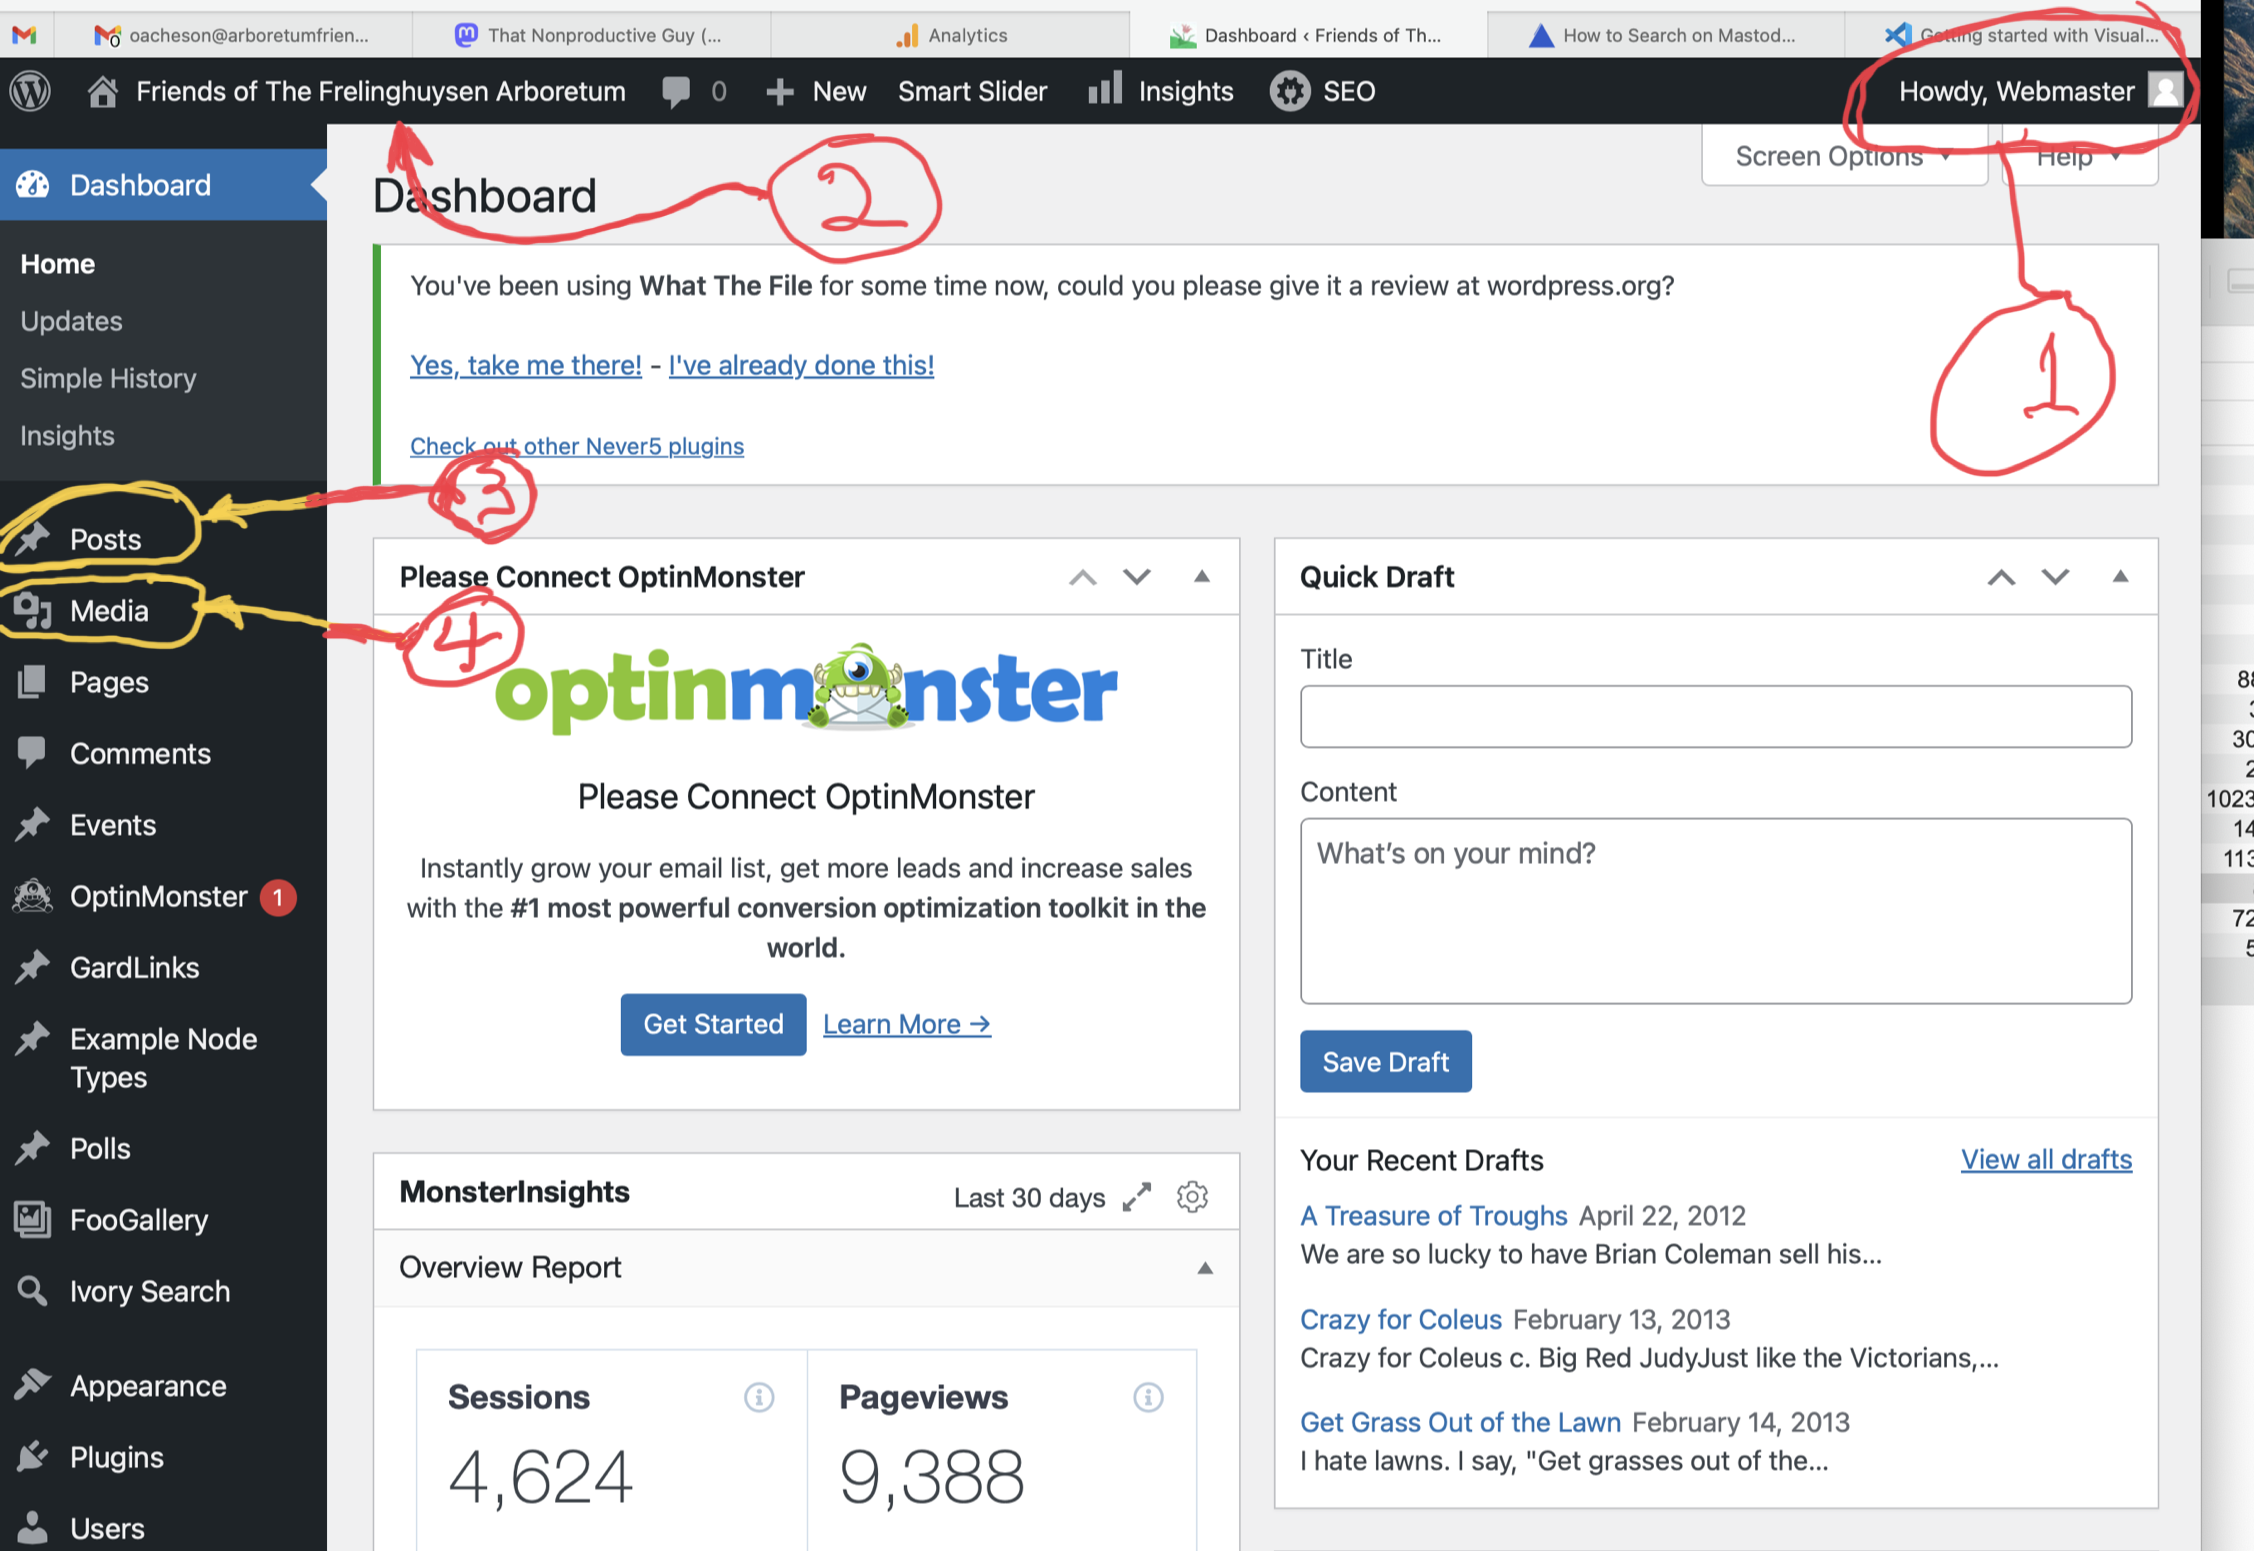
The first page displayed on logging in to the website is the administrative dashboard. Click the screenshot at right to enlarge it. Numbers correspond to the annotation on it.
#1 At the top right you will see your username. Hover your cursor over that to see the Logout link.
#2 Hover over “Friends…” for the link “Visit Site” to go to the website. While on the site, return to the dashboard the same way.
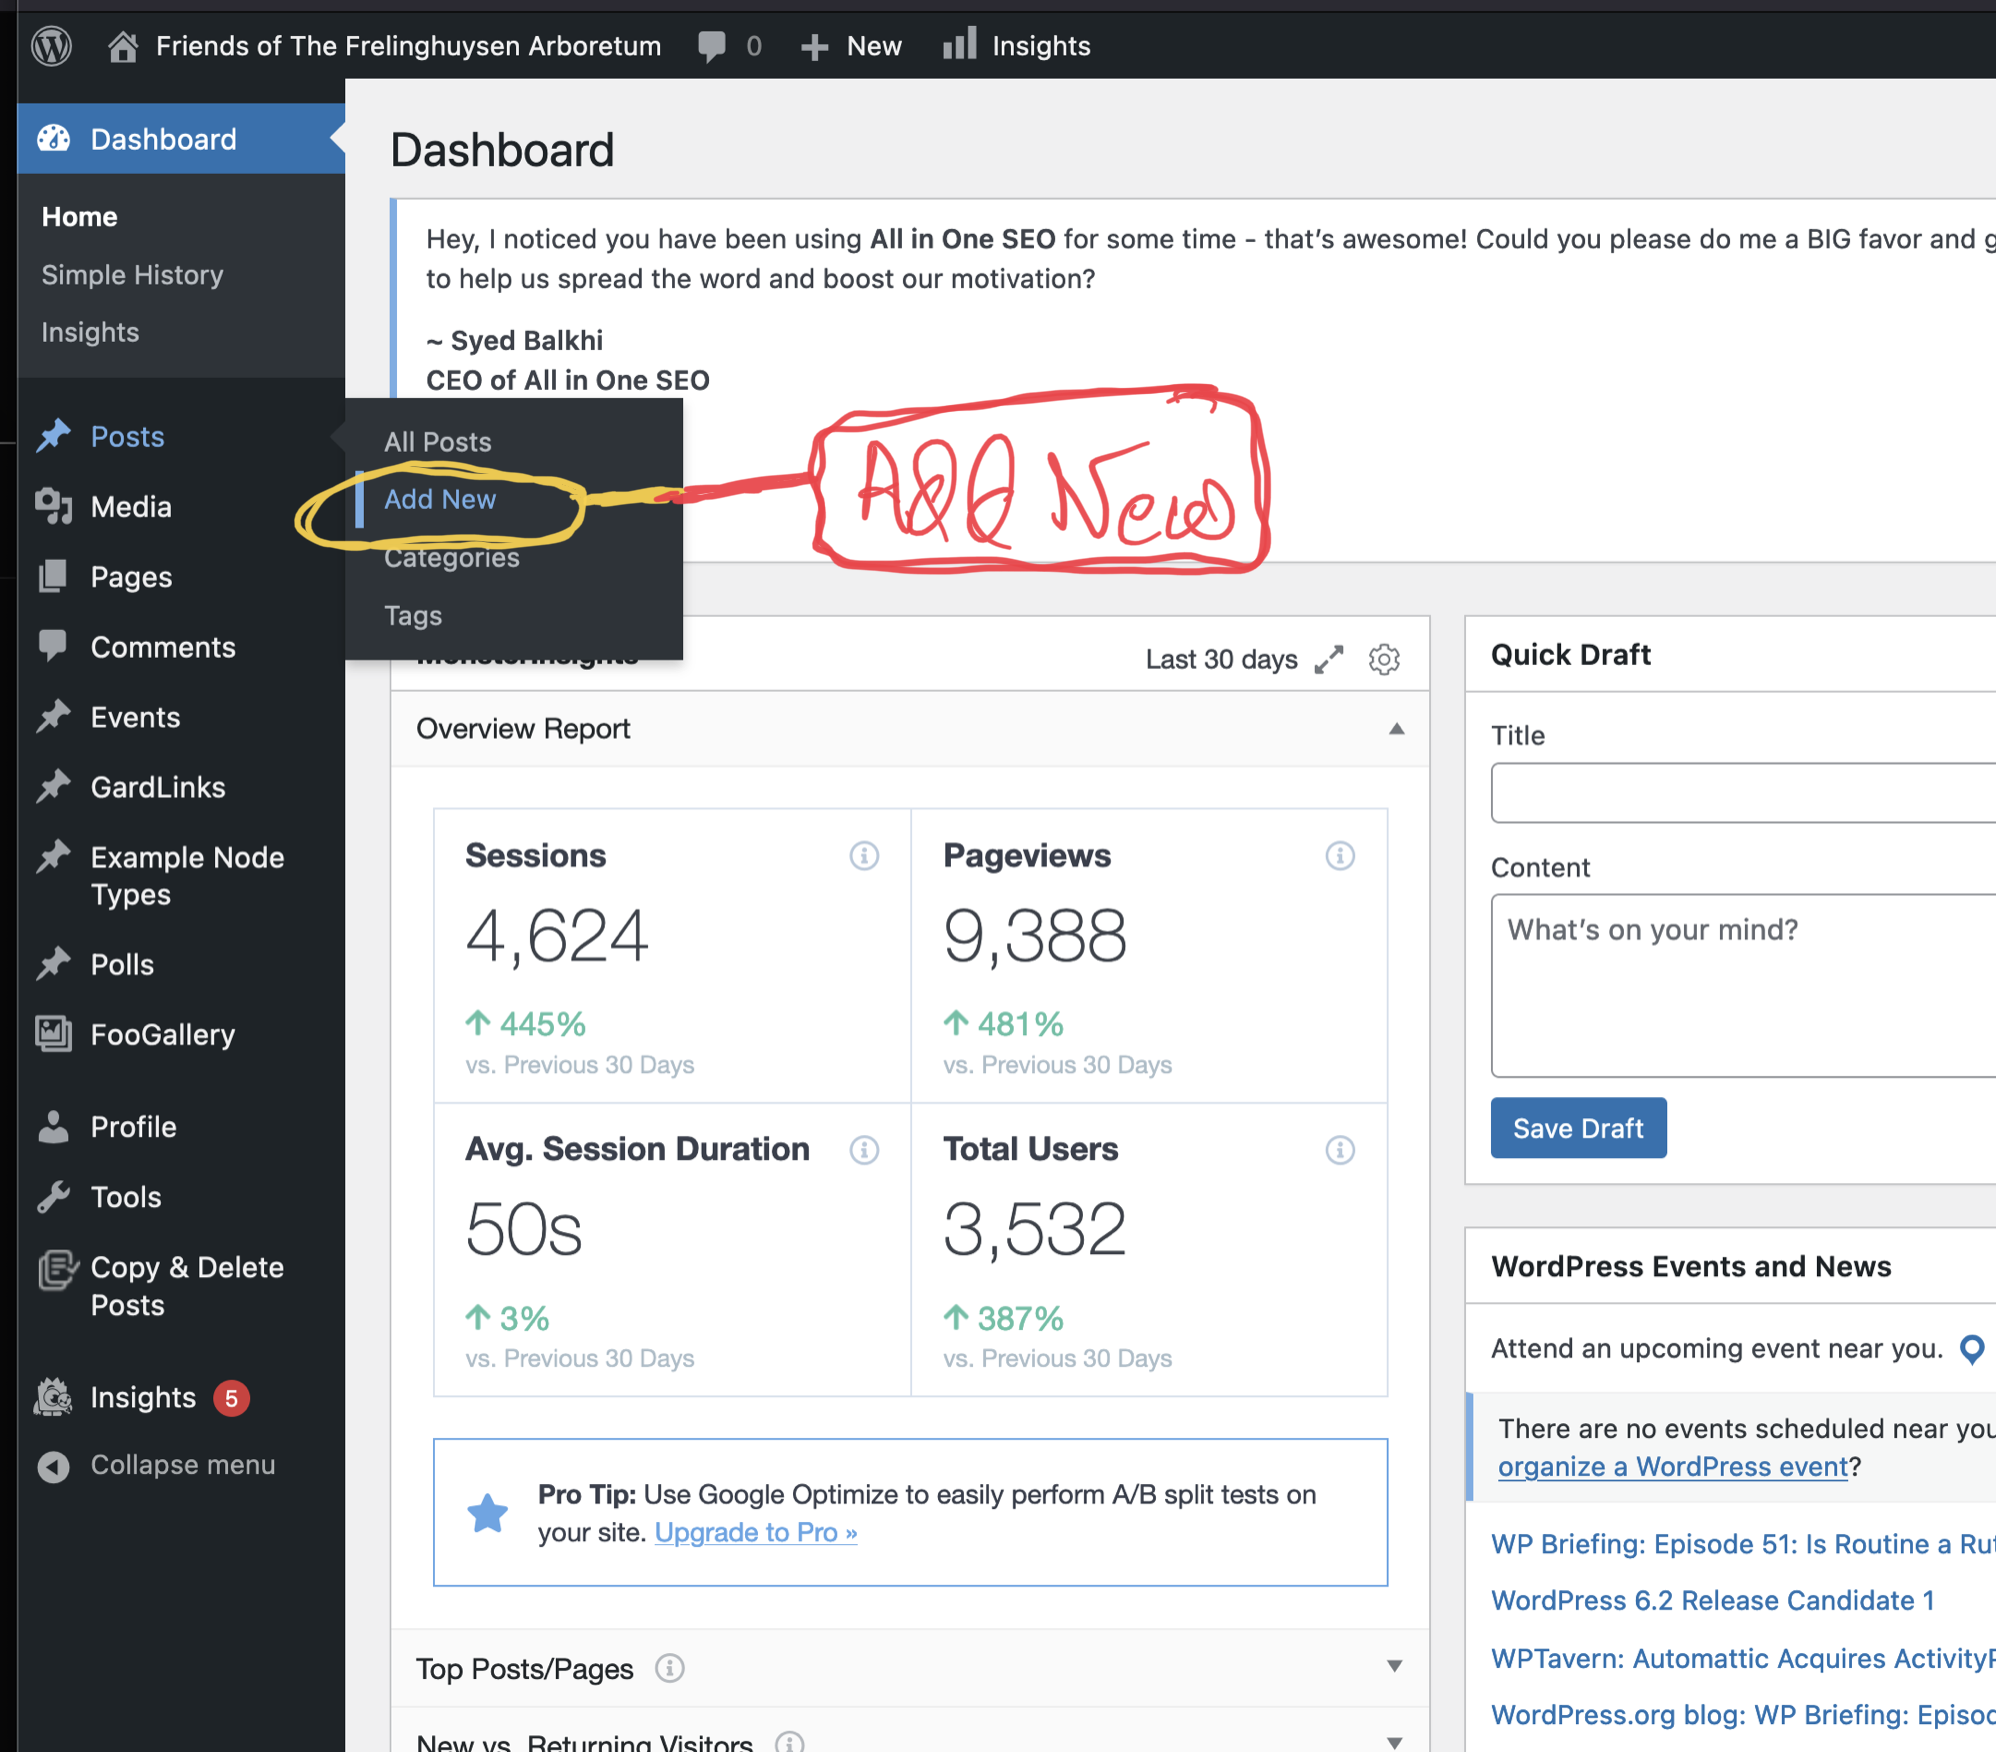
#3 Posts and # 4 Media open important menus for finding or adding posts or media (images, pdf’s, etc.). Hover over Posts, then click on Add New.
Add New Post
When you first enter the new post screen, WordPress sometimes shows a help screen for the block editor. Click through it or close it and proceed with entering a new post.
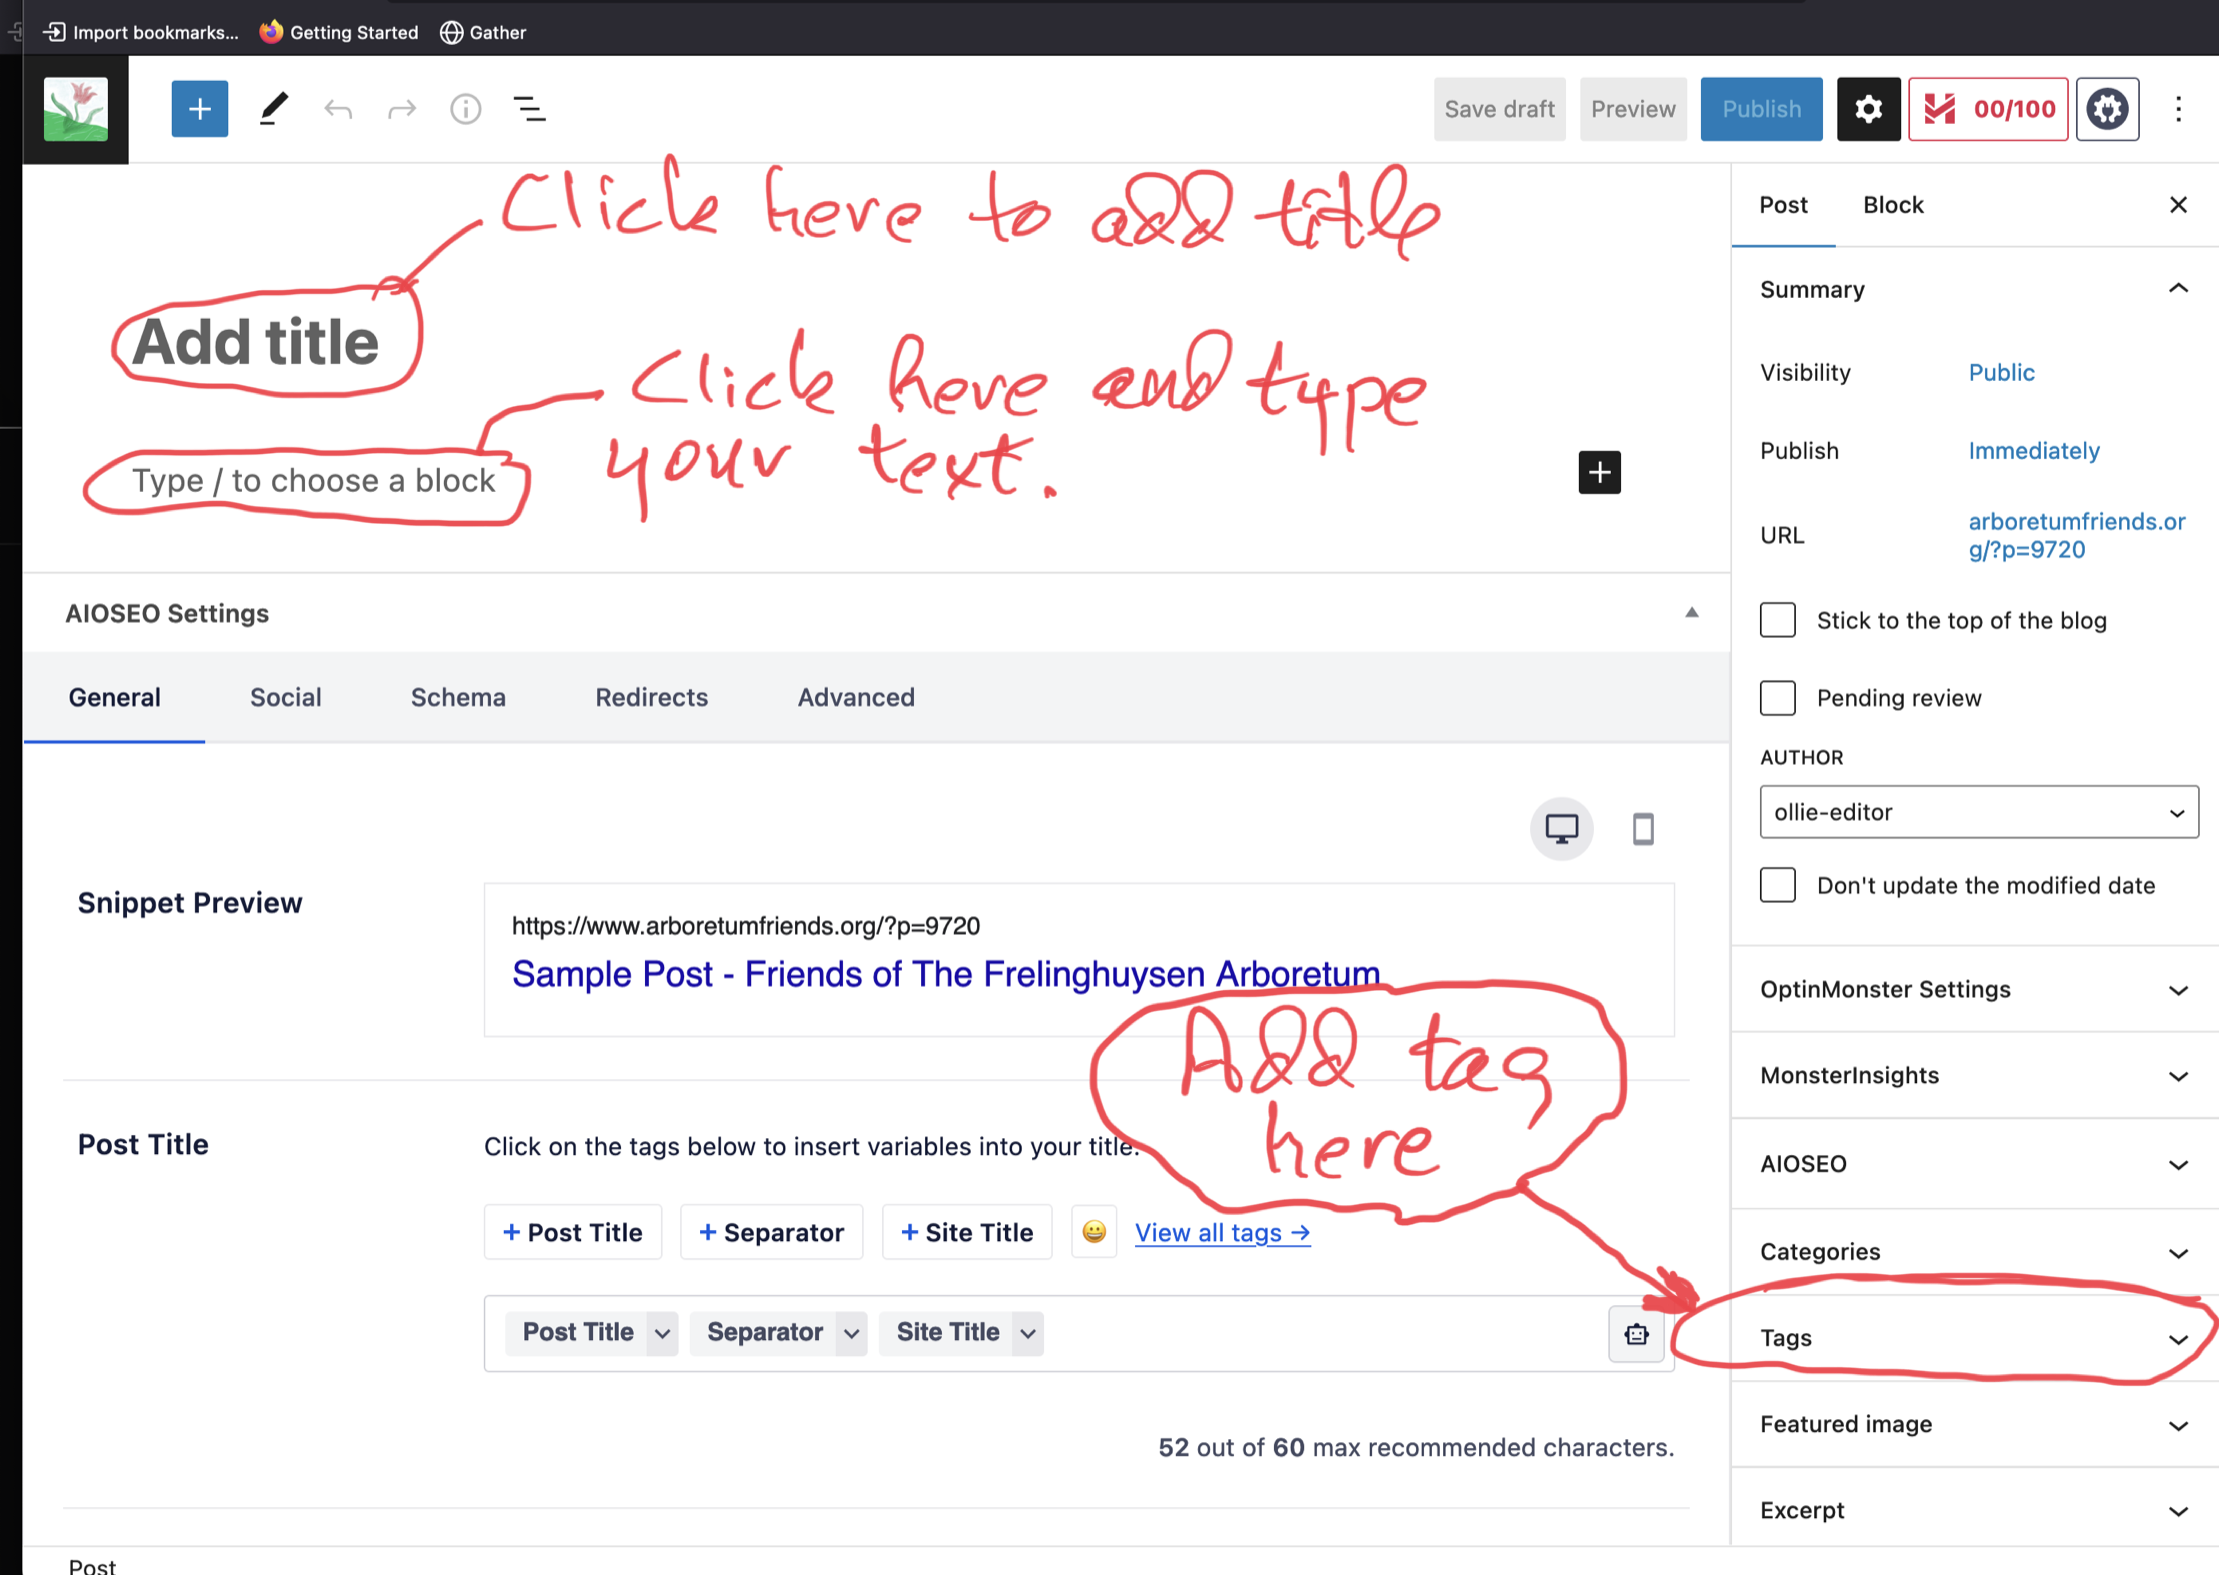
The screenshot at right shows the layout of the post edit screen. Add your post’s title, then the text body. Press “Enter” at the end of each paragraph to start a new paragraph.
When done, expand the Tag section in the right sidebar and add the tag “PS-24” followed by Enter.
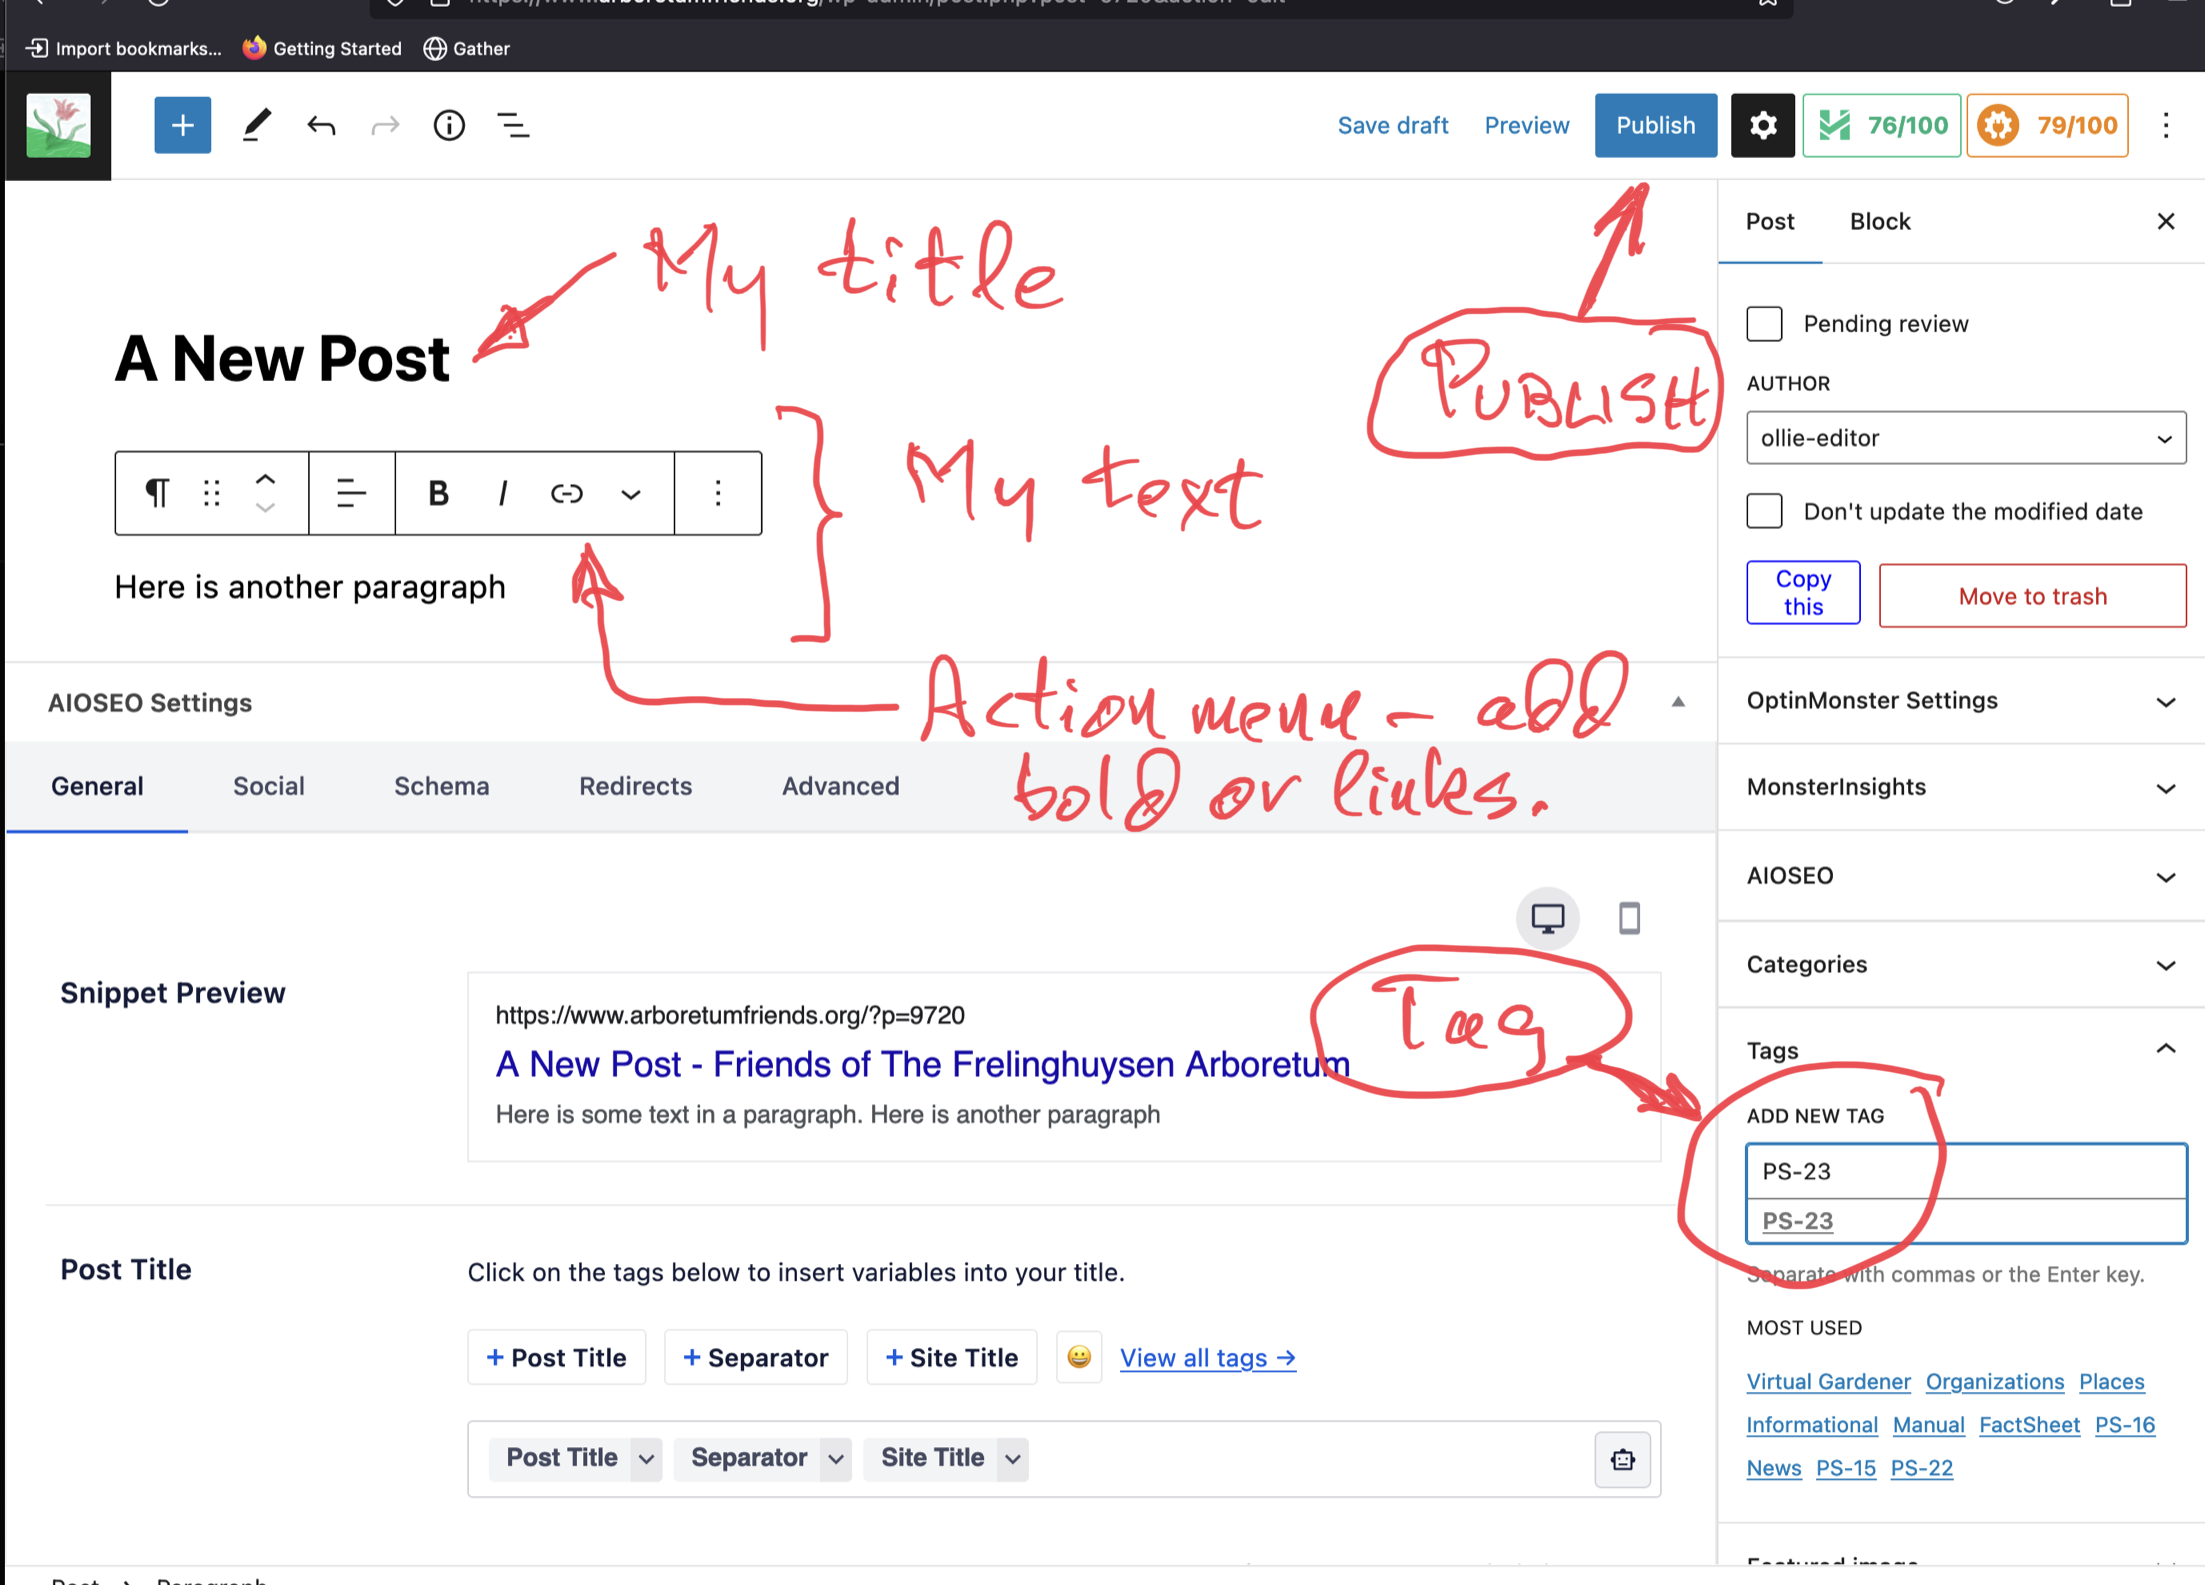
By now, your edit screen will look something like the next screenshot. You can make corrections or additions, add images and headings and otherwise customize your post.
When you are done, click the blue Publish button at the top of the right sidebar and press the second Publish button that appears to confirm the process.
Click the “View Post” link that appears under your post. If you want to go back to edit the post, click the “Edit Post” link in the black bar at the top of the screen.
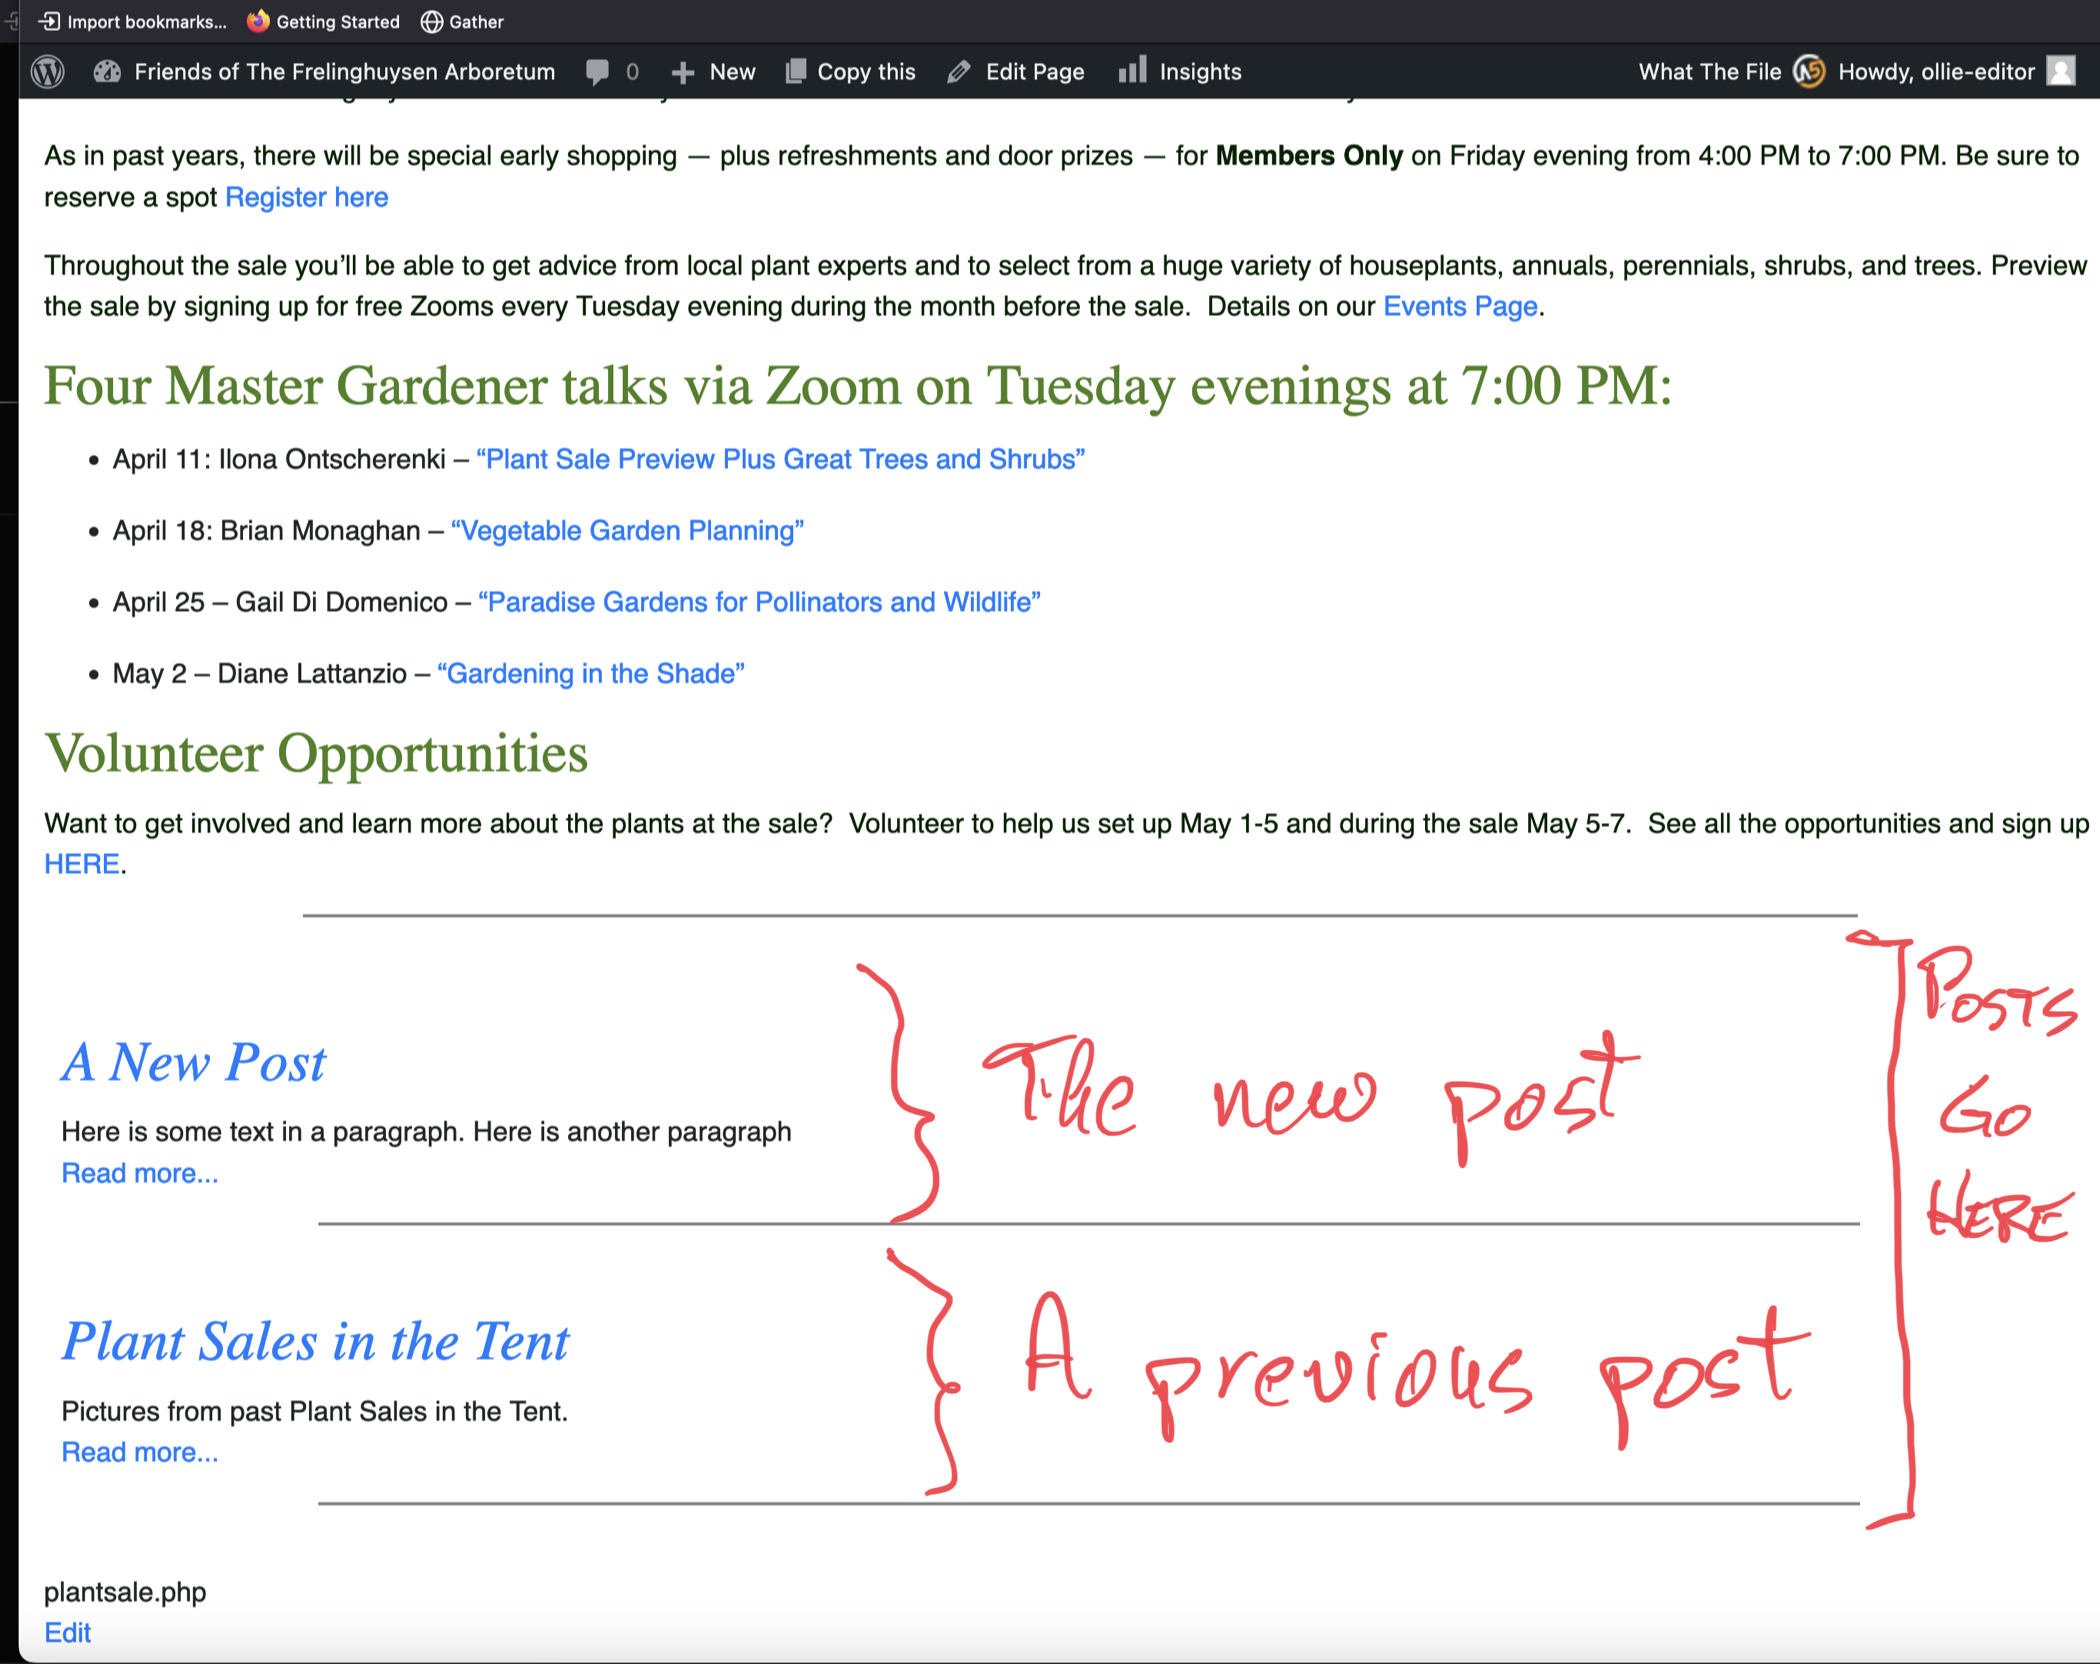
Then, go to the Plant Sale 2024 page to confirm that your new post appears in the posts area of the page as illustrated in the image at right.
Add a Link to a Post or Event
To add a link to a post or event you are working on in the editor,
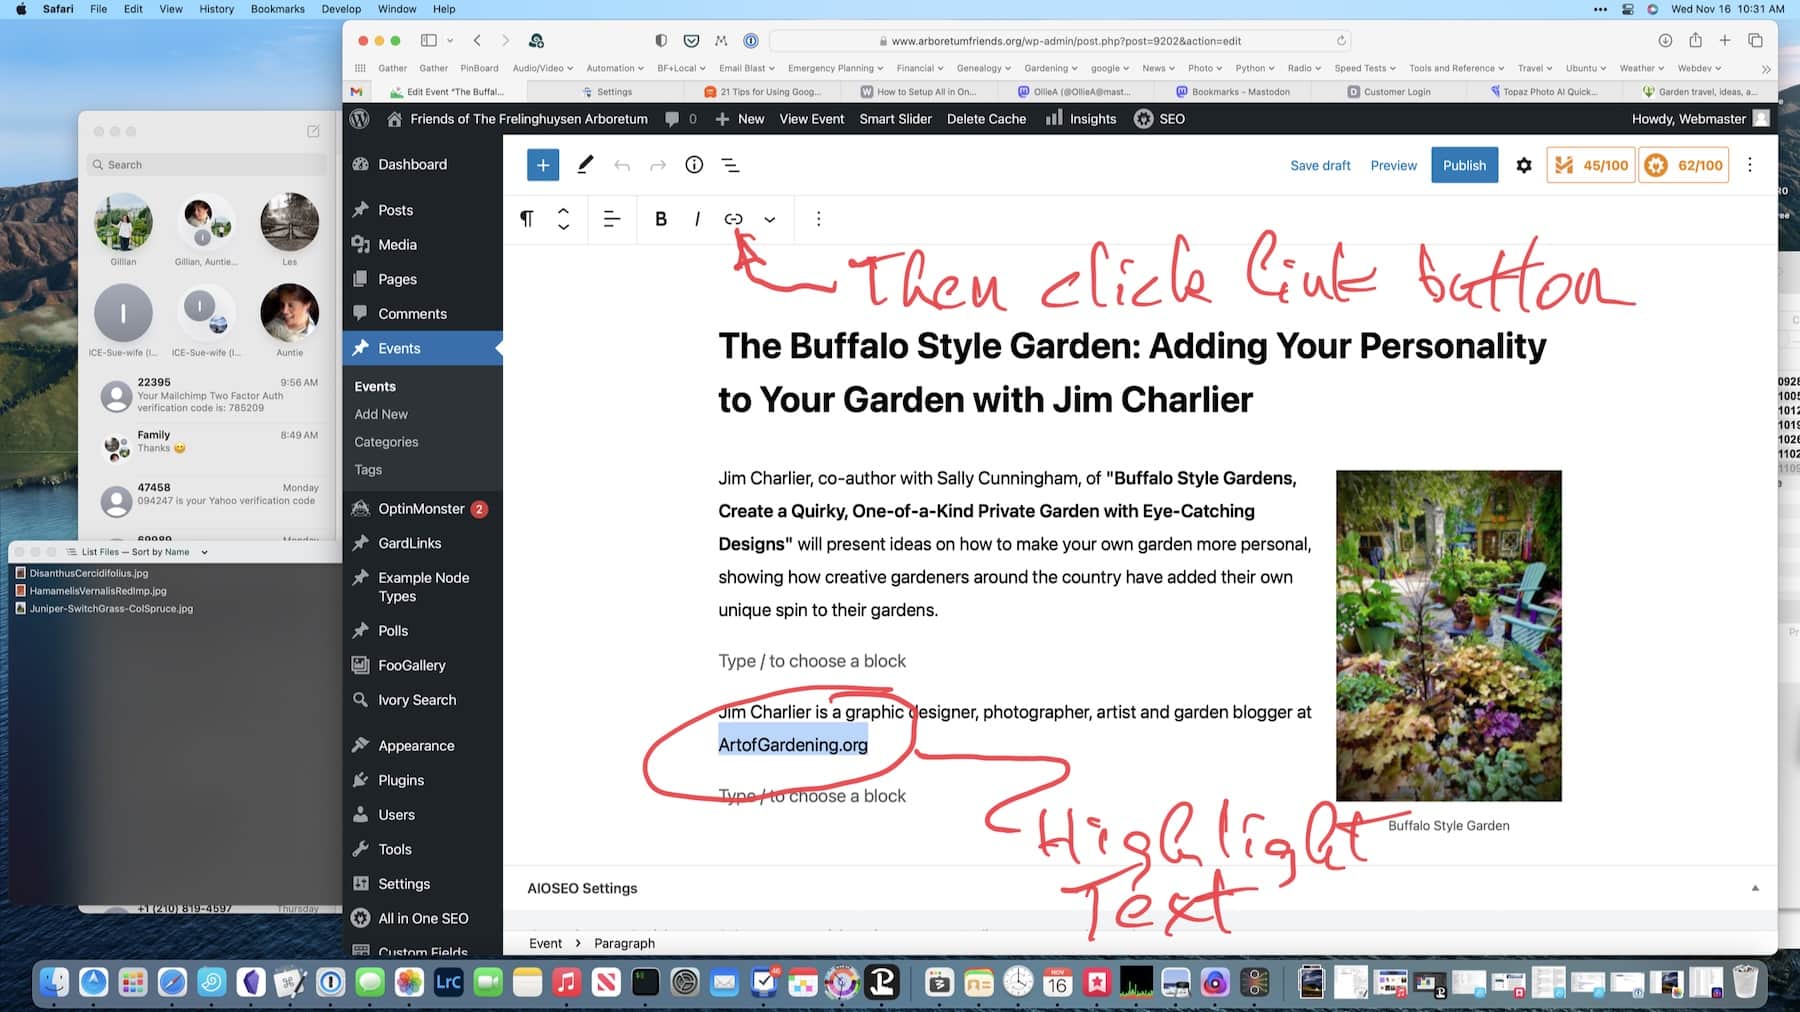
First, highlight the text you want to make into a link …
Then, click the link button in the toolbar (looks like a hyphen inside parentheses).
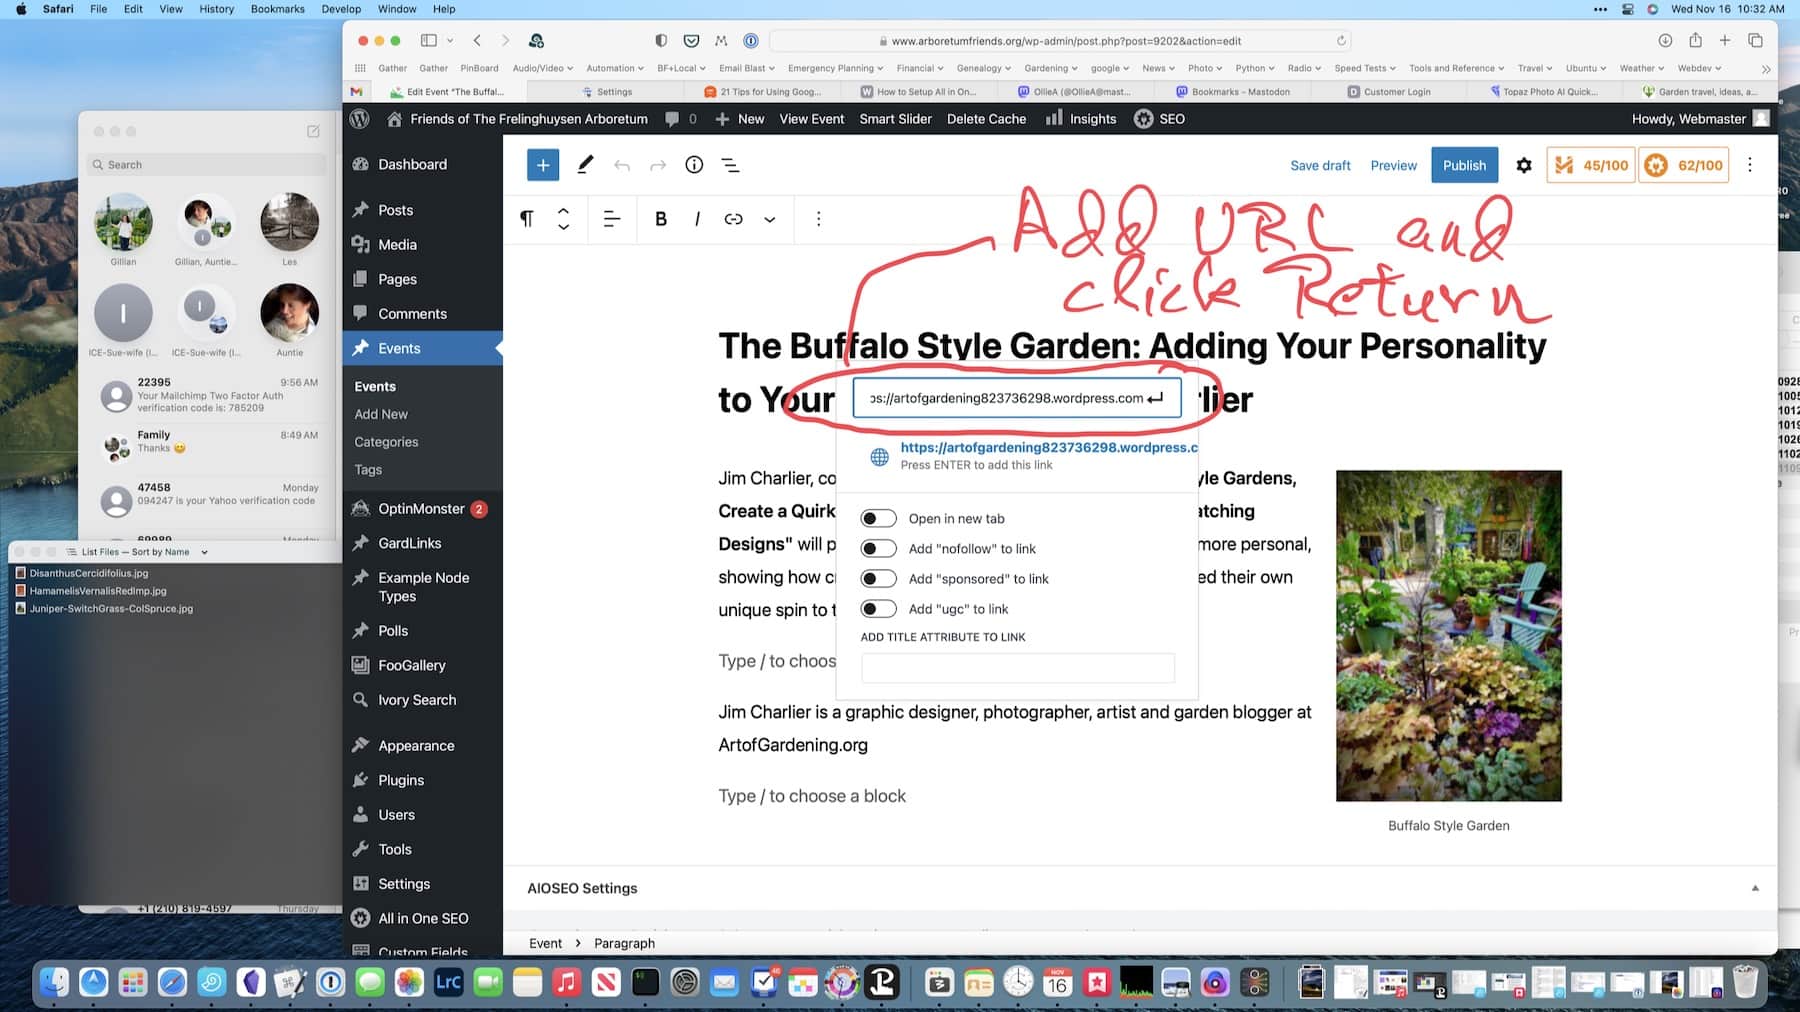
In the dropdown, copy and paste the URL you want as the destination for the link.
Note that it must be a full URL, starting with http:// or https://, so the best way to do this is to navigate to the destination in your browser and copy (Control or Command C) the URL from the browser’s address bar. Then paste (Control or Command V) it into this dropdown.
Return to save the URL and click back in the editor. You should see the familiar underlined blue text designating a live link. After you save and preview the page, test the link to make sure it works.
This works in any text block, e. g. Headings, Paragraphs, Lists, etc.
FOFA Manual – Images & Galleries in Posts
Adding images or galleries to posts or pages is easy in WordPress.
The starting point is to add your images to the Media Library. This is discussed in more detail in FOFA Manual – Images and the Media Library. Pay special attention to the discussion of image sizes and standards there and elsewhere.
Once you have your pictures in the Media Library you can open your post in the editor or create a new post. I find it easiest to enter the text for the post first and then to add the images, but you could just as well add some text, then some images and so on. Take your pic

Insert a single right-adjusted image
So, assuming you have your text in the editor window and want to add a single image:
- Hover your cursor between the text paragraphs where you want to insert. A “+” sign should appear. Click it and then select Image.
- Select media Library as the source which opens it.
- Search for the image – the library is sorted by added date, so probably your image is at or near the top. Otherwise, try the text filter for file name or caption.
- Click the image, the the Select button at lower right.
- That will place a full-sized image into the editor widow.
- While that image is still selected, change the image size to Medium in the right sidebar.
- Then, change the alignment to Align Right in the image block toolbar (#2).
- You can move the image up or down on the page by clicking the arrows in the image block toolbar (#1).
- Click the link button (#3) in the toolbar and then Media File to add a link to the image so when you click it the full-sized image opens.
- Click the Publish or Update button to save your changes. Remember to click publish twice.
Repeat this process to add more images throughout the post.
Insert a photo gallery
Sometimes inserting a group of pictures, a photo gallery, is more appropriate. To do so takes three steps:
- Add your images to the Media Library.
- Create a photo gallery with the FooGallery plugin.
- Insert that gallery into your page or post.
1. Add your images to the Media Library
- Gather your images, resizing if necessary to fit under the 2 MB image size limit. A good pixel size is long edge = 2400 pixels.
- Add the images to Media Library following these directions: FOFA Manual – Images and the Media Library
- Categorize the images as “Gallery” and add captions and descriptions (this is very important — Google downgrades our search if we have pictures without the ALT or DESCRIPTION field).
2. Create a photo gallery with FooGallery
FooGallery is a WordPress plugin that speeds gallery creation. Follow these steps:
- In the dashboard, click on FooGallery, then Add New Gallery.
- Add a title to your gallery, then click the button “Add from Media Library” which then opens.
- Select all the images you want to include, then click the “Add Media” button in the bottom left.
- Your gallery is ready to save, so click “Publish” in the right sidebar.
- Now click the Shortcode further down the right sidebar. This copies that code to your clipboard which you will use in the next section, inserting the gallery into the post.
3. Insert the photo gallery into your post
Now you can either create a new post (in left sidebar Post | Add New) ir open an existing post (in left sidebar Post | All Posts then open the desired post in edit mode.
Select the place you want your gallery in the post and add a new shortcode block:
- Place your cursor where you want the gallery.
- Click the “+” button at the top to open the block add screen. Search for shortcode and then click it.
- Click in the box where it says “Write shortcode here” and then paste the shortcode from the earlier section. If you have lost it from your clipboard, you can go back to FooGalley, open the desired gallery and click the shortcode again. Be sure to save your post first by clicking switch to draft or Publish or Update at the top right. Then return to your post and paste the shortcode into its block.
And that’s it. Once you Publish or Update the post, the text and the gallery you created will appear for everyone to see.
This content is restricted.
This content is restricted.
This content is restricted.
This content is restricted.
FOFA Manual – Photo Galleries
Combining WordPress’s Media Library with the FooGallery plugin allows creation of high quality image galleries that may be displayed anywhere within the site.

Click the thumbnail at right for a summary of the workflow, details of which are below.
1. Add Images to Media Library
- See Standards for appropriate sizes.
- Use “Add New” under Media Library to open upload page.
- Drag and drop images.
- Wait till all images uploaded and processed.
2. Categorize those images as “Photo Gallery”
- Go to main Media Library page. The new images should be at top.
- Select them all (checkboxes on left) and drag them onto “Photo Gallery” category in left sidebar.
- Add captions to each image by going to list view, then unlock by clicking “Edit mode is locked” at top. This is very important since Google downgrades our search position if we don’t fill in the ALT, DESCRIPTION and CAPTION columns on each of our images.
- Then type captions next to each newly added image.
3. Create FooGallery using those images in Media Library
- Open Add New FooGallery (in left sidebar).
- Add the title.
- Click “Add from Media Library”
- Select images followed using checkboxes and then clicking “Add Media” in bottom right.
- On return to FooGallery page, click “Publish” button on right.
4. Copy FooGallery shortcode – click on the shortcode displayed under Gallery Shortcode on the right.
5. Create new post for display of photo gallery – click on Add New Post in left sidebar.
6. Add title and text as appropriate.
7. Add shortcode as last block – add a shortcode block, then paste the shortcode from step 4, above.
8 Categorize post as “PhotoGallery”
9. Publish and check
- View the newly created gallery post.
- Are the images there?
- Do they open to full size?
- Do the navigation buttons work?
- Then go to Photo Gallery page. Does the newly created gallery show there?