A Morris County Park Commission staff member dismantles the festive holiday decorations at the Haggerty Education Center (HEC) – Goodbye 2023 and welcome 2024, may it prove to be a good year for all!
A beautiful Hellebore flower (Christmas Rose) blooms in a large planter at the entrance to the HEC and a fragile, delicate-looking Maple (Acer sp.) samara has nestled itself among the foliage of the Chamaecyparis obtusa cv. Kosteri Fast Form (Hinoki False Cypress) tree, also at the entrance to the HEC.
While the Friends use PayPal as their credit card processor, the does not lock our visitors into having to sign up for a PayPal account. Following are screenshots and explanations for how to do so both for checkout of event purchases as well as for donations.
Shopping Cart Checkout
PayPal Checkout 231021 Screenshot
After you have clicked on PayPal buttons for various events on our Events page, your selections are stored in a shopping cart like the one at right (click on it to enlarge the image).
Two buttons are shown, “PayPal checkout” and “Check Out Pay without a PayPal Account.” Click on the latter button.
PayPal Checkout 231021 Screenshot
PayPal may recognize you as an account holder and offer to log you in.
Click ESC (the Escape key) to clear that and expose the alternative route link below.
PayPal Checkout 231021 Screenshot
So here is the screen after clearing the login information.
Click the “Try another way” link to reveal the next screen.
PayPal Checkout 231021 Screenshot
Finally, click “Pay with Debit or Credit Card” to reveal the final screen in our journey.
Obviously, PayPal would prefer our paying with a PayPal account.
PayPal Checkout 231021 Screenshot
On this screen we can either select paying with ApplePay (the button at top) or filling out the form with our credit card information and paying with that.
Either route leads to payment for the balance in our shopping cart and generation of a confirming email.
Donations
PayPal Donate 231021 Screenshot
After clicking the Donate button, the screen at right opens.
Fill in the Amount field, then click the second button, “Donate with Debit or Credit Card.”
PayPal Donate 231021 Screenshot
This screen captures Special Instructions, as, for example, “In memory of” or similar information.
Then fill in the credit card details and click the “Donate Now” button at bottom.
Today we’re featuring the lovely Koelreuteria paniculata ‘Rose Lantern’. This is a dense, rounded, deciduous tree which grows to a height of between 30 and 40 feet with an equal or greater spread. It has pinnate leaves that emerge reddish in the spring, mature to a bright green and turn yellow in the fall. Airy panicles of delicate golden yellow flowers bloom in summer followed by dramatic, rose-pink, bladder-like fruits in the fall.
Known as the Golden Rain Tree, the Arboretum’s specimen can be seen on the left at the end of the first parking bay as you come up the driveway from Hanover Avenue. Make a point of visiting it soon and come back to see the bladder-like fruits in the fall!
Here are just a few of the unusual plants used in this year’s entrance gardens to the Haggerty Education Center. Plantings made possible by a grant from the Friends of The Frelinghuysen Arboretum.
Talinum paniculatum ‘Jewels of Opar’: A succulent subshrub commonly known as Fame Flower or Pink Baby’s Breath. The bright lime green leaves and small pink flowers held atop thin dark stems are a lovely addition to the garden bed. The plant is native to much of North and South America and the Caribbean.
Mangave ‘Silver Fox’: A hybrid plant that offers the attractive structure of Agave and the faster growth and colors of Manfreda. It has broad, toothed blades with a thick waxy coating and can tolerate more water than other succulents.
Berkheya purpurea ‘Zulu Warrior’: A deep rooted and drought tolerant South African native perennial. It has single, smoky lavender flowers with dark purple centers held atop flower stalks that can reach 3 feet in height. The plant has spiky silvery green leaves and makes an excellent cut flower.
Ptilotus exaltatus ‘Joey’: A compact, short-lived herbaceous perennial with large, long lasting, conical spikes of feathery flowers. Attracts bees and butterflies and is a good cut flower.
Talinum Jewels of Opar
Talinum Jewels of Opar
Berkheya Zulu Warrior
Berkheya Zulu Warrior
Mangave Silver Fox
Mangave Silver Fox
Ptilotus Joey
Ptilotus Joey
Click on an image to enlarge. Picture credits: Margery Ennist.
Here is a new batch of photos taken at the arboretum from frequent visitor, Steve Kanan. He has done a good job of capturing late spring’s progress, including a couple of our feathered friends.
Currently in full bloom at the Whippany Road exit from the Arboretum is a gorgeous Cladrastis kentukea (Yellowwood) with its white, sweetly scented, pea-like flowers. Several Cornus kousas (Kousa Dogwood) are blooming around the property with their pointy white bracts. Last, but not least, a Chionanthus virginicus (White Fringe Tree) is full of its delicate, strappy white flowers.
There are many other white blooming shrubs and trees at the Arboretum; pay us a visit and see what you can find!
Many thanks to everyone who shopped at our 2023 Plant Sale last weekend (May 5-7, 2023); it was great to see you all there!
A great big heartfelt thank you to all of the wonderful volunteers who made sure everything ran smoothly before, during and after the sale. We couldn’t have done it without you!
The Frelinghuysen Arboretum’s grounds are lovely to stroll through, but you might also want to sit, relax and simply enjoy your surroundings. There’s a wide choice of seating areas, in the sun, in the shade, under cover, etc. The teak benches next to Matilda’s cottage offer a shady place to rest, read or just sit. The benches in the blue garden in front of Matilda’s are in the sun and are a lovely complement to the blue flowers in the beds. The table and chairs in the gazebo overlooking the Marsh Meadow offer a comfortable place to enjoy a picnic lunch and watch the birds. These are by no means the only seating areas at the Arboretum, come for a visit and discover others on your own!
To create a URL to a particular event on the Events page
Go to the EventsDev-Future page on the website (https://www.arboretumfriends.org//EventsDev-Future). This is a page that not only shows the current published events but also includes un-published events. Importantly for today’s task, it also includes the ID number for each of the events which you will need below.
Scroll down to the desired event. Let’s use the 4/7/22 Biblical Botany lecture as an example. Look at the title for that event and you will see a 5-digit number in parentheses. It is 10803 in this case.
The URL that will open the Events page to that particular event is made up of 3 pieces, one right after the other, with no spaces or punctuation:
Make sure your photo is a jpg or png file no larger than 1000 pixels on an edge. Put them in an easily found location, e.g., your desktop.
Click the “Add Event” link in the WebDev Links section and add your text. When ready, click at the beginning of the line where you want to insert the picture (#1 in screenshot) and then click the image handling button (#2).
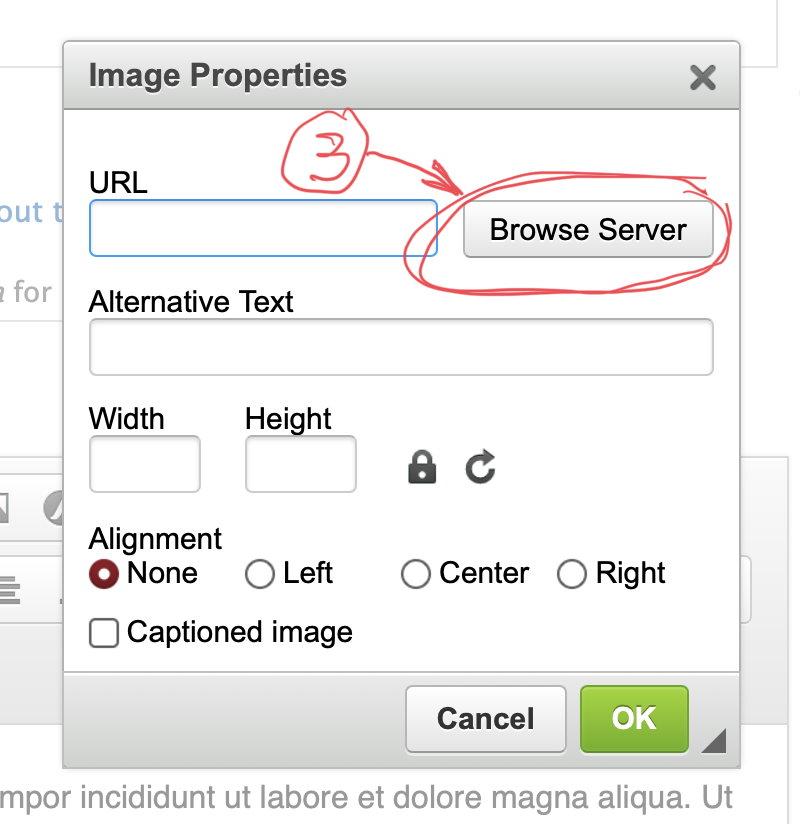
Click the “Browse Server” button (#3) to open the server’s file manager window.
Now make sure the “Pictures” folder is highlighted (#4 – this is where you want to store the images) and then click the “Upload” button (#5).
Now click “Choose file” (#6)
Select the file you want to upload (#7) and then click “Choose for Upload” (#8).
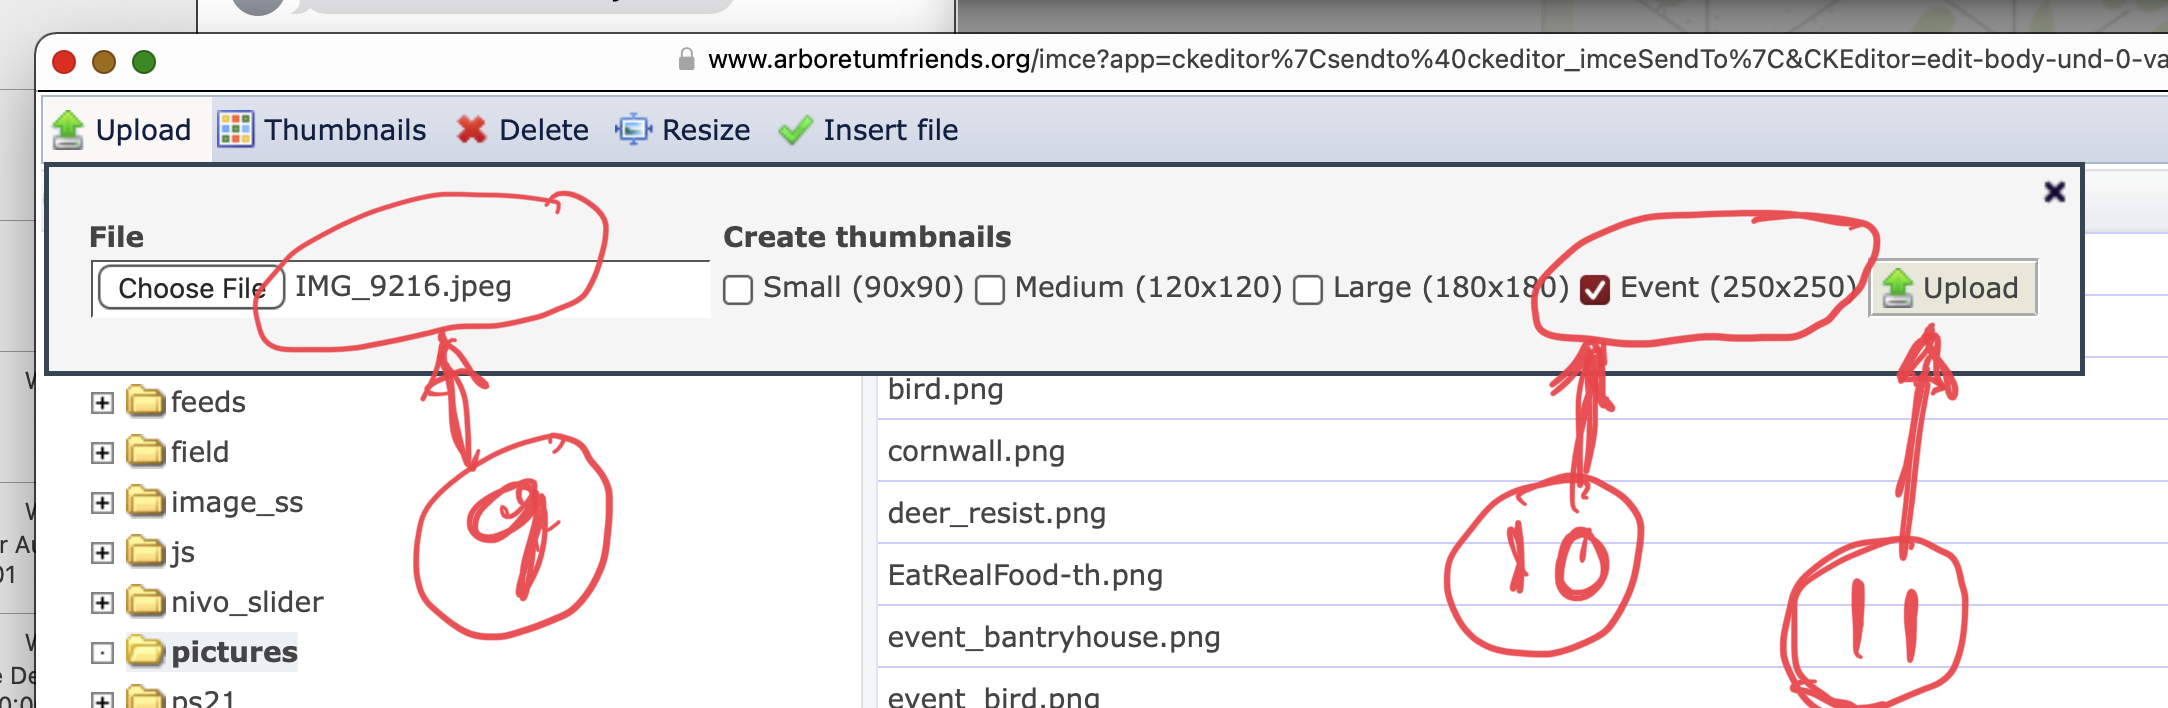
Note the name of the file you chose is in the window (#9). Check the Event (250×250) box (#10) and then click “Upload (#11). This uploads the image plus a resized copy (250×250 pixels) to the server.
The file list now shows 2 versions of the file, the original you uploaded plus the resized version with “Event_” inserted at the beginning of the original name. Select the “Event_filename.jpg” (#12) and then click “Insert file” (#13).
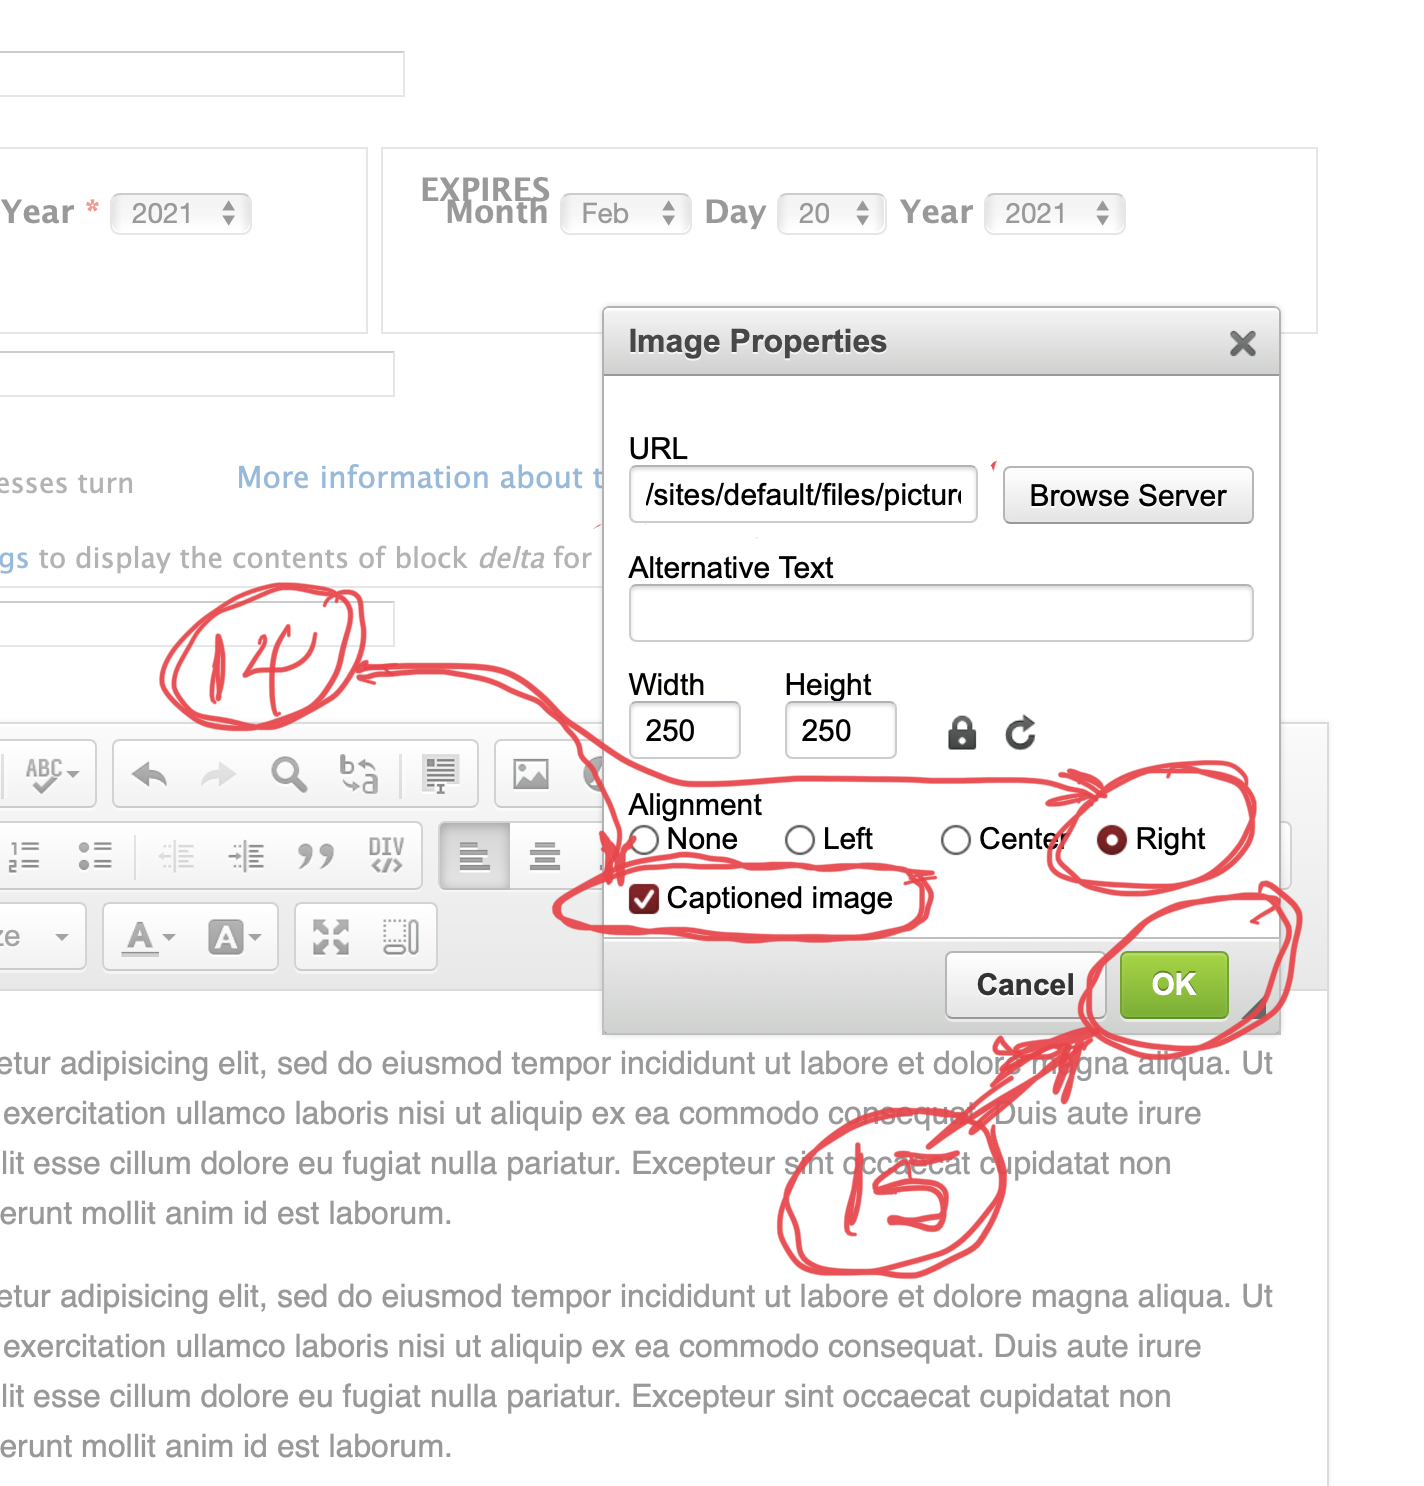
Now we are back to the Image Properties window from several steps ago, but now the URL is filled in as are the Width and Height. Check the “Alignment Right” and “Captioned image” boxes (#14) and then click “OK” (#15).
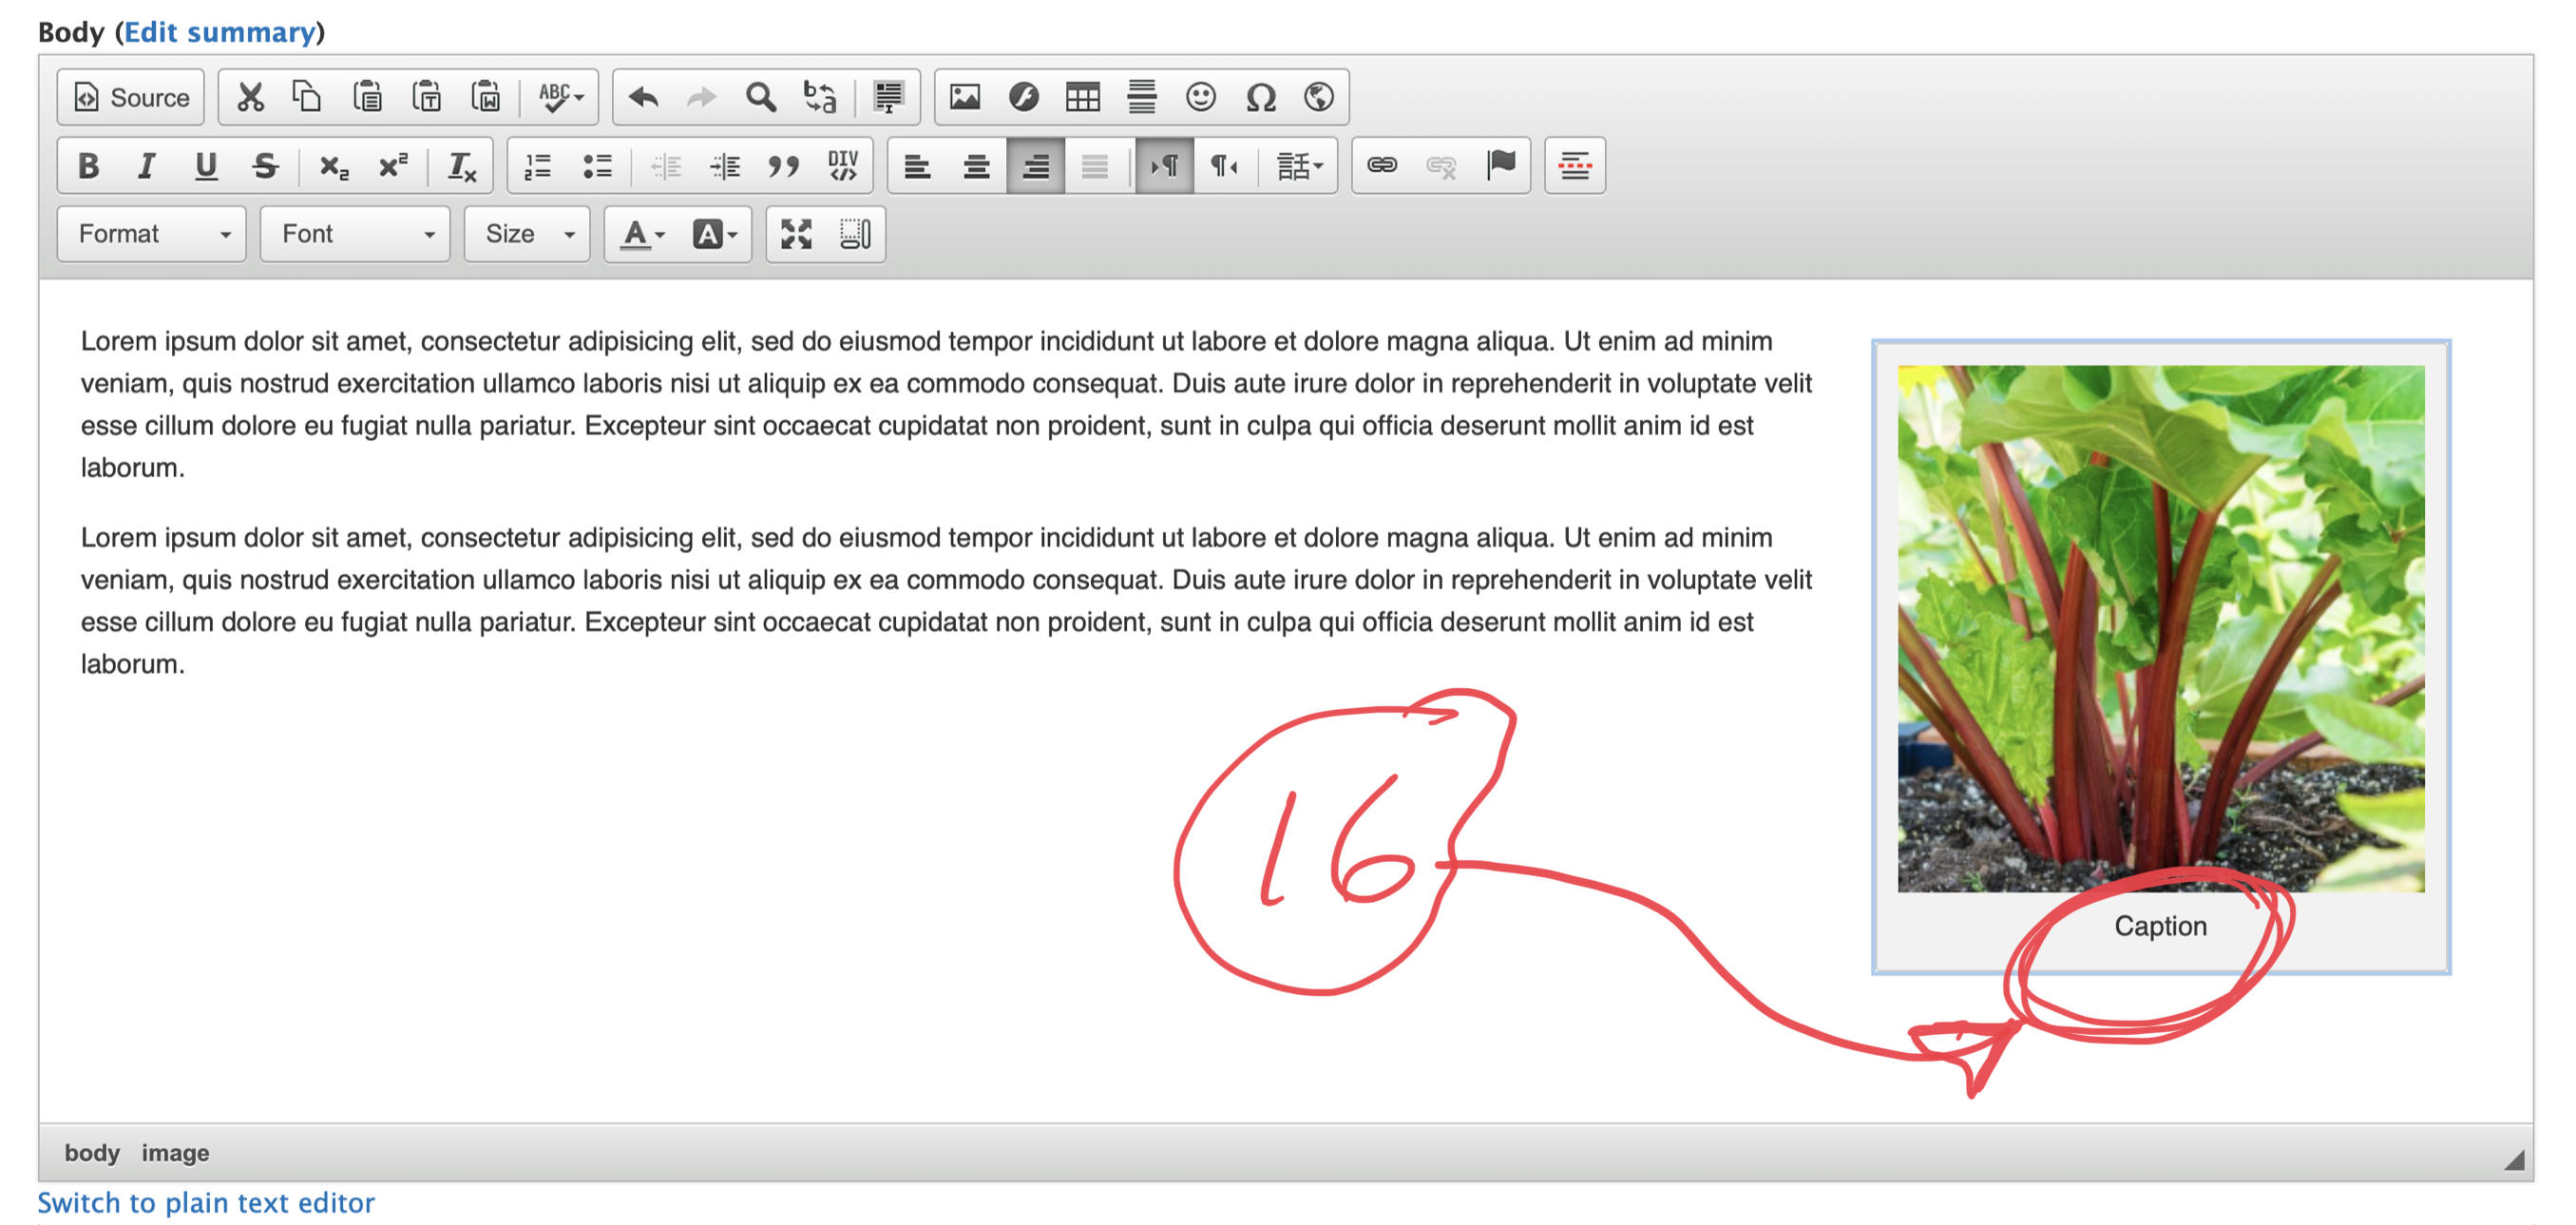
And here we are back in the with our image inserted. One more step, though. Either add a new caption to the image or delete the word caption (#16).
DON’T FORGET TO SAVE!
And here is the finished product. Note the space between the image and the text.