Tag: Manual

Setting the SOLD OUT flag prevents sales from the virtual plant sale page. Following are the steps to do so:

  1. Log in to the site.
  2. Go to PS Admin view (link in the right sidebar or https://www.arboretumfriends.org//ps21-ADMIN)
  3. Scroll to “Lilac Sunday” and click its title.
  4. Click the “Edit” button.
  5. Click “Yes” under PS_Sold_Out
  6. Click “Save” button all the way at bottom.

Once PS_Sold_Out is changed to “Yes” Sold Out appears in red for the plant on the Plant Sale list and the “Add to Cart” button no longer appears.

URL to Particular Event on Events Page

To create a URL to a particular event on the Events page

  • Go to the EventsDev-Future page on the website (https://www.arboretumfriends.org//EventsDev-Future). This is a page that not only shows the current published events but also includes un-published events. Importantly for today’s task, it also includes the ID number for each of the events which you will need below.
  • Scroll down to the desired event. Let’s use the 4/7/22 Biblical Botany lecture as an example. Look at the title for that event and you will see a 5-digit number in parentheses. It is 10803 in this case.
  • The URL that will open the Events page to that particular event is made up of 3 pieces, one right after the other, with no spaces or punctuation:
    • Events page URL: https://www.arboretumfriends.org//Events
    • The pound sign: #
    • The event id number: 10803
  • Leading to: https://www.arboretumfriends.org//Events#10803 as the desired URL.
  • If you navigate to that URL and if the event is still published, then your browser will open the Events page at that particular event.

Image Files – How to Insert into an Event, Article or Blog Entry

Revised 2/22/21

Make sure your photo is a jpg or png file no larger than 1000 pixels on an edge. Put them in an easily found location, e.g., your desktop.

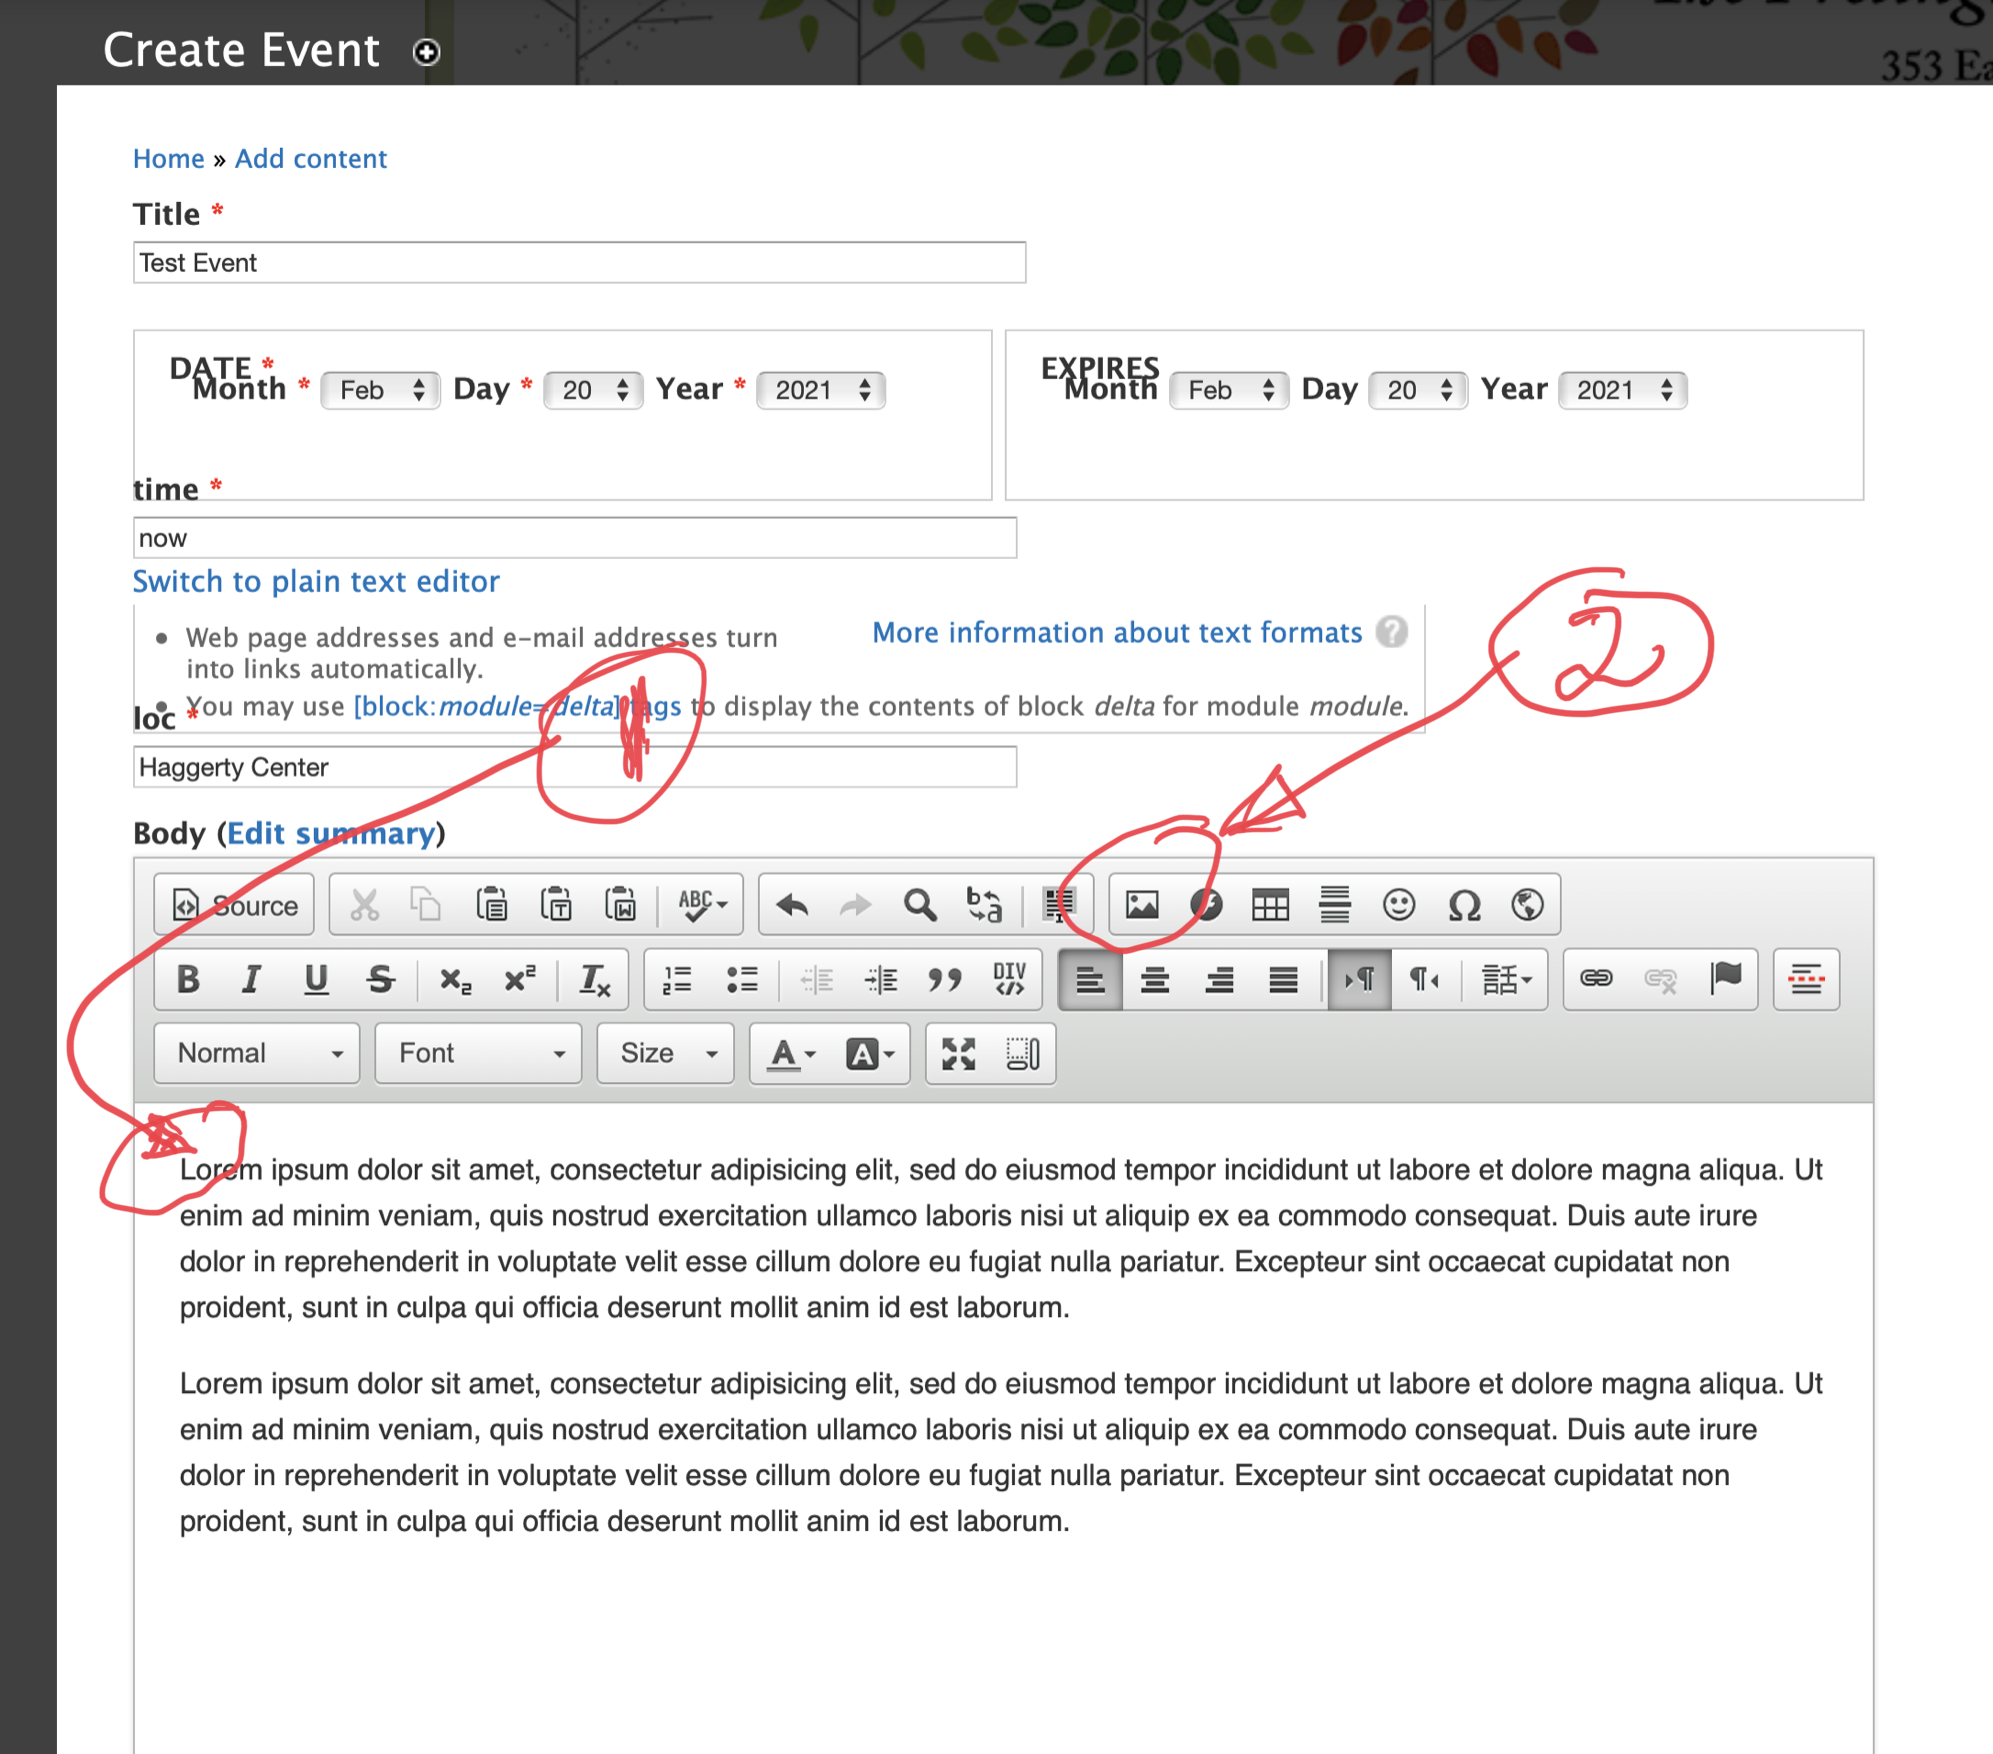
Click the “Add Event” link in the WebDev Links section and add your text. When ready, click at the beginning of the line where you want to insert the picture (#1 in screenshot) and then click the image handling button (#2).


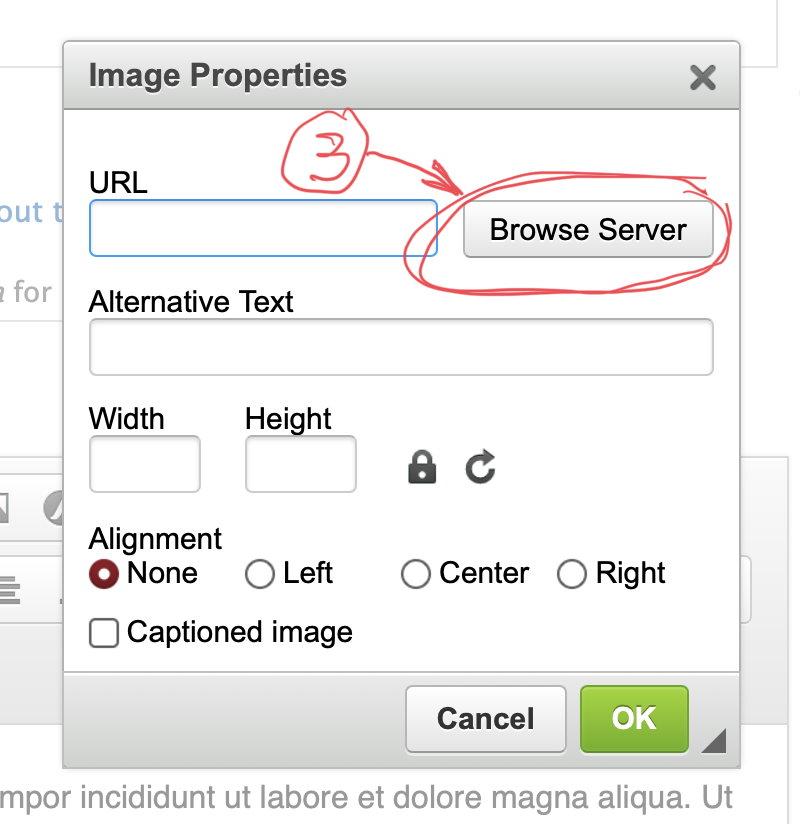
Click the “Browse Server” button (#3) to open the server’s file manager window.


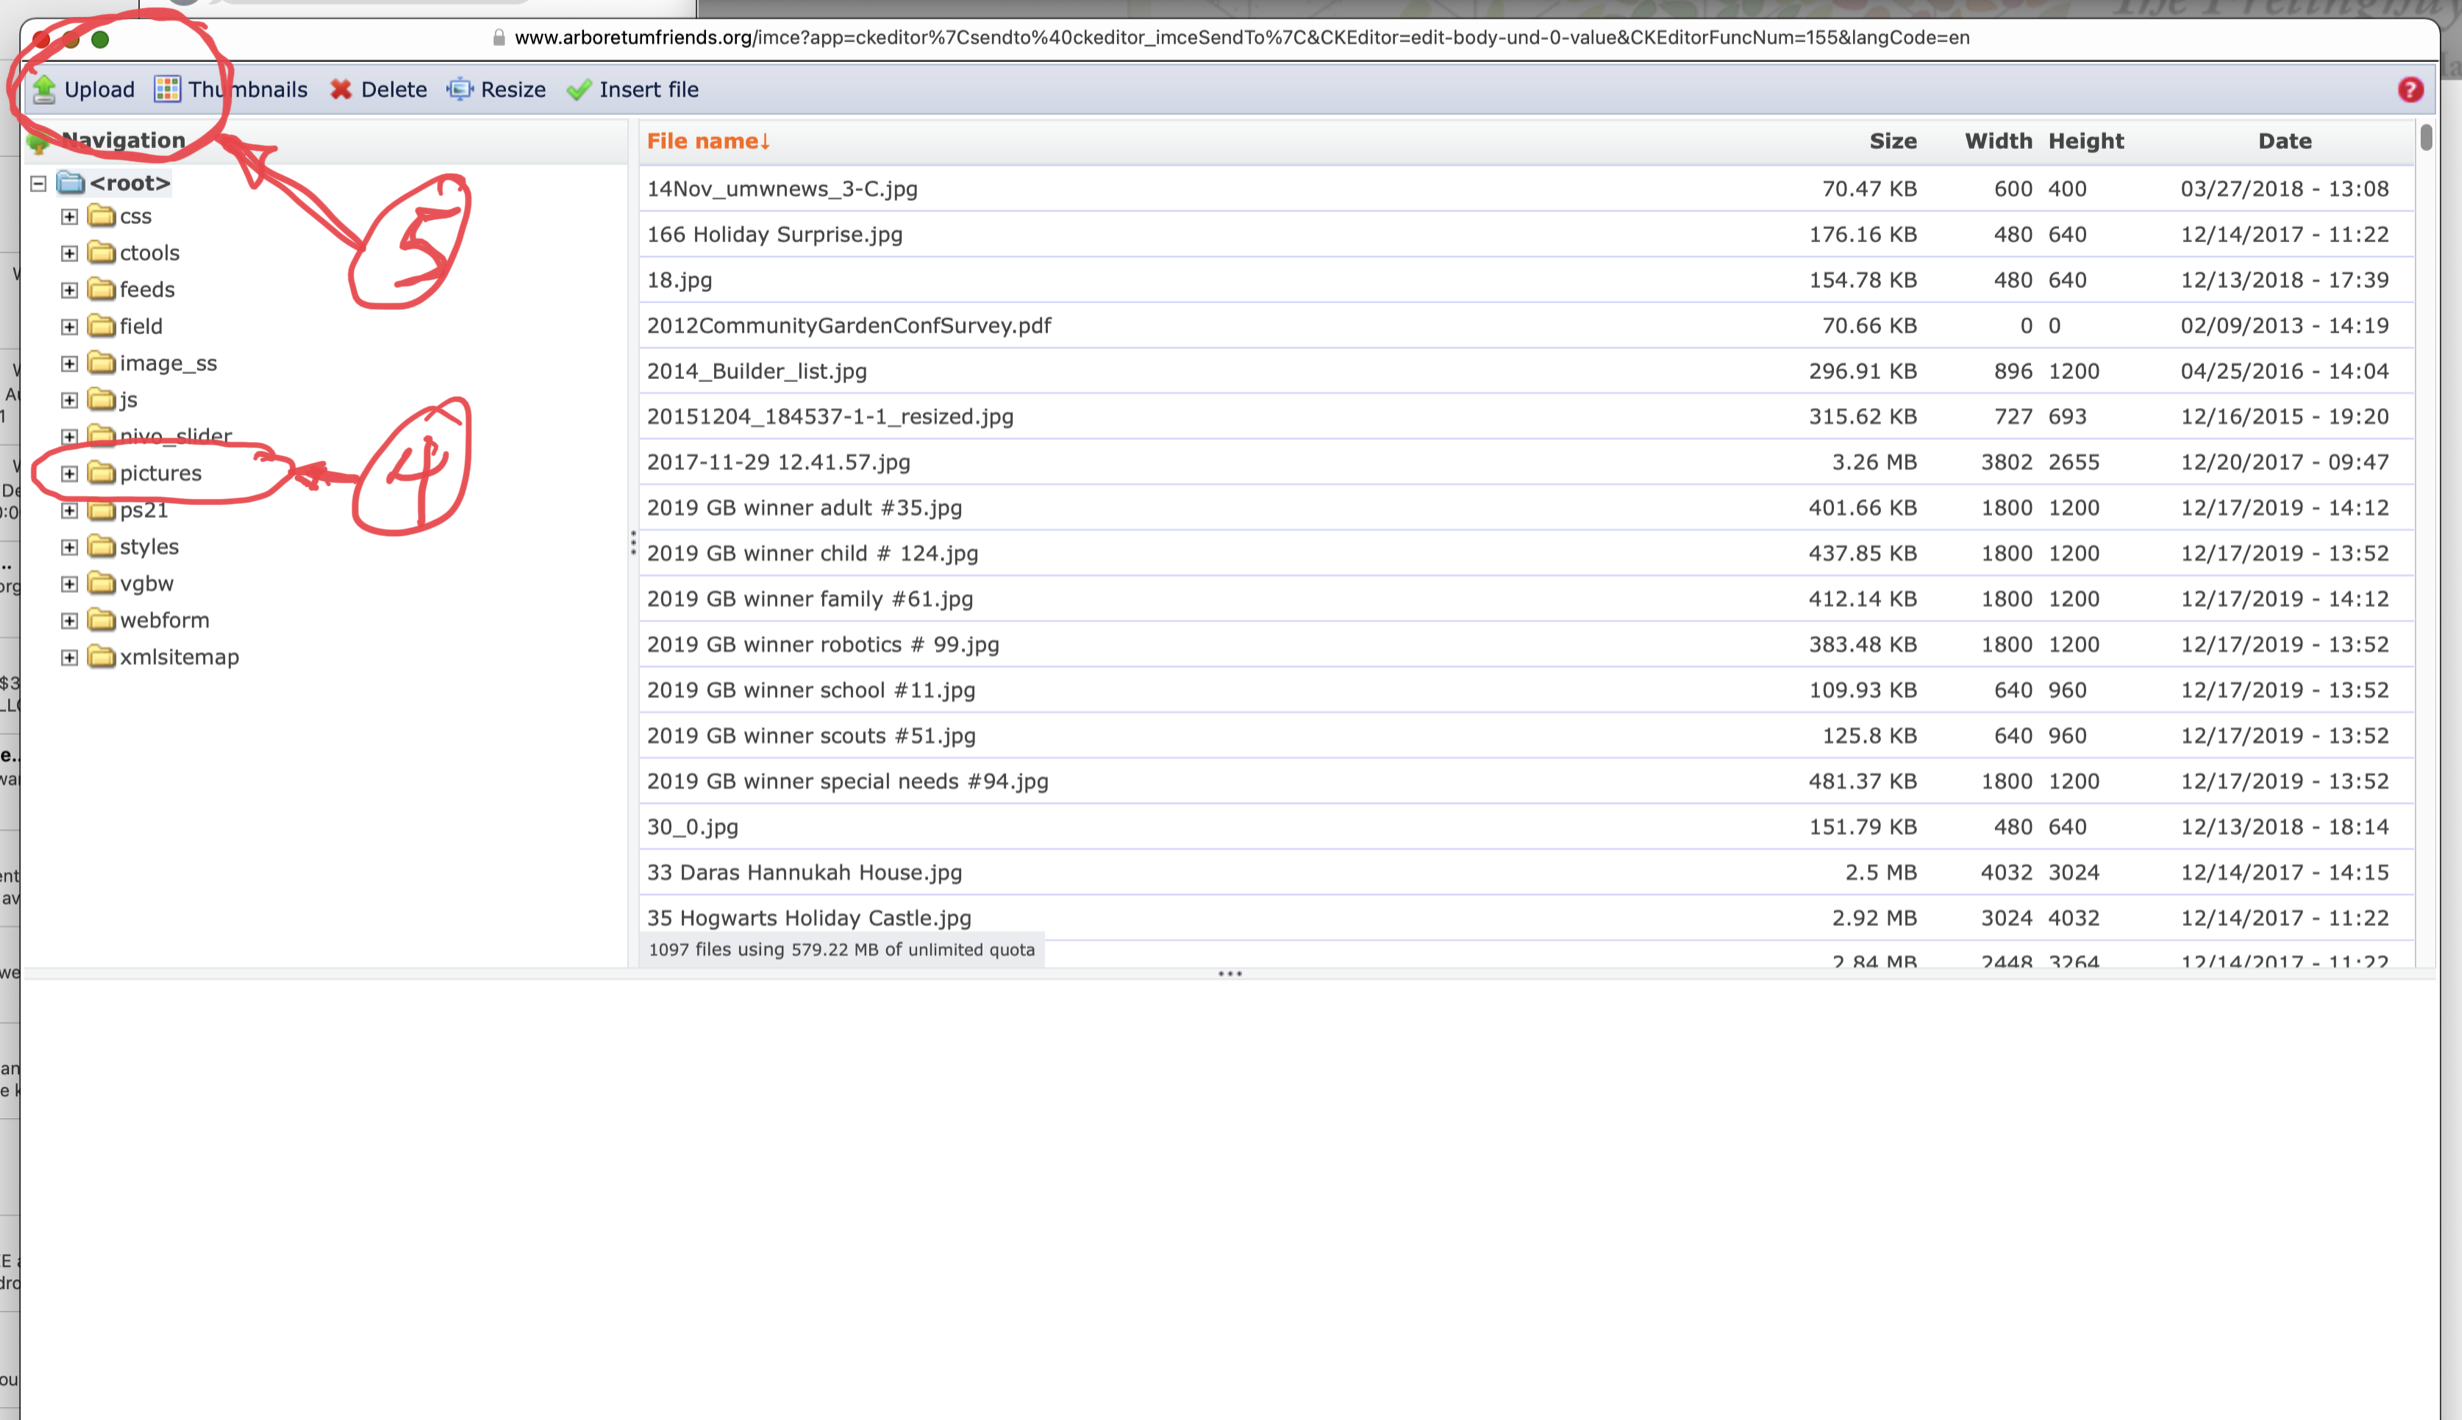
Now make sure the “Pictures” folder is highlighted (#4 – this is where you want to store the images) and then click the “Upload” button (#5).


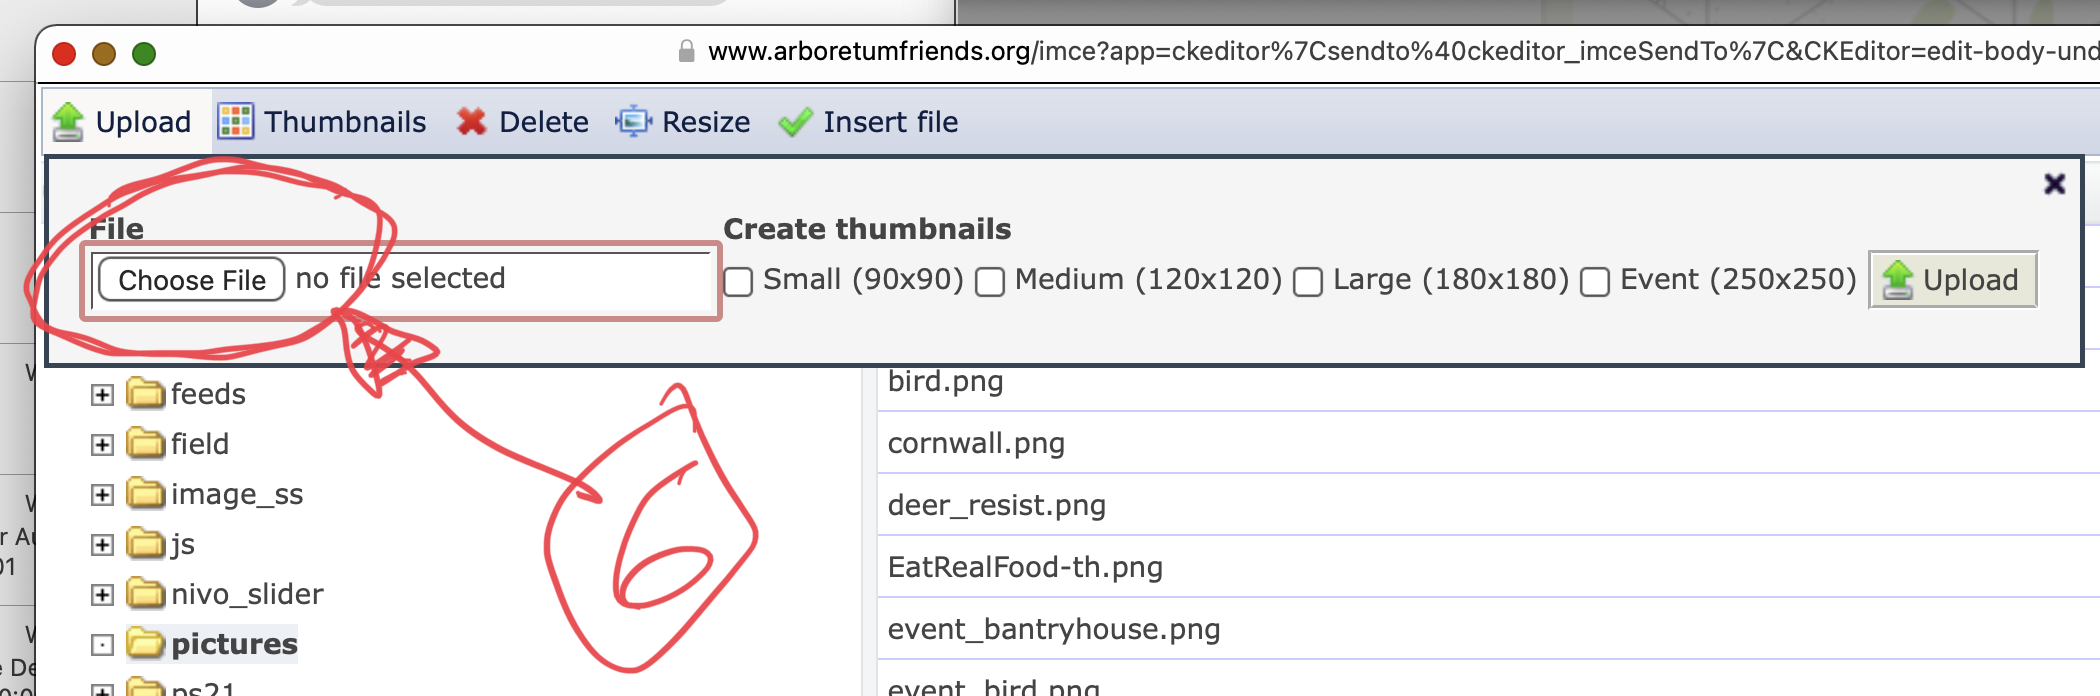
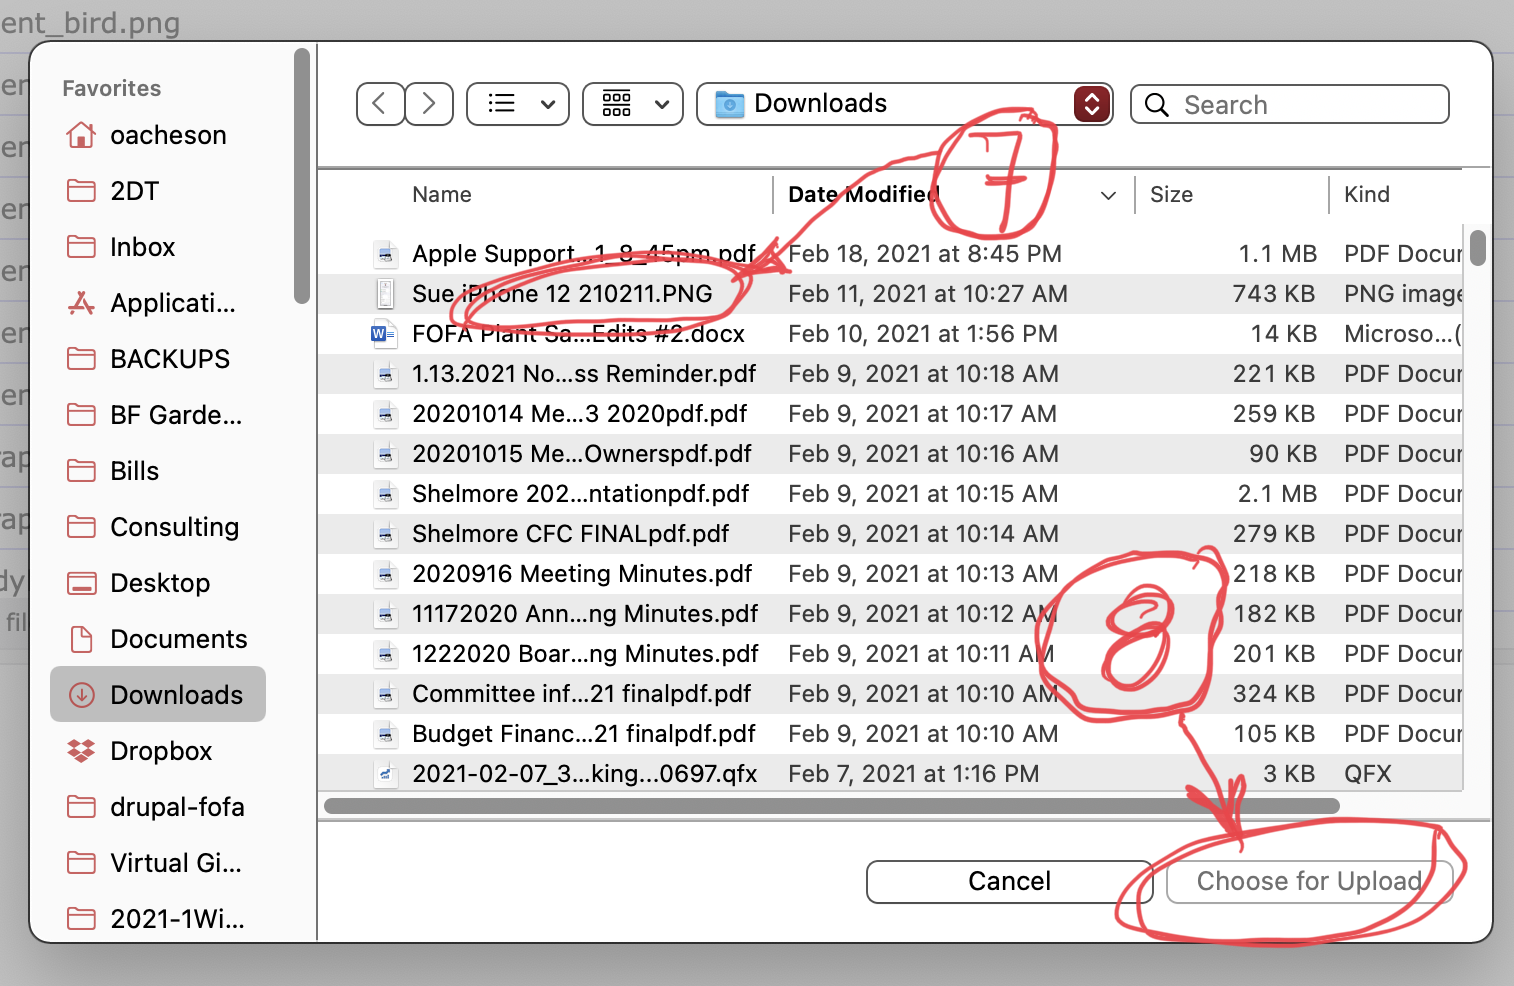
Now click “Choose file” (#6)


Select the file you want to upload (#7) and then click “Choose for Upload” (#8).


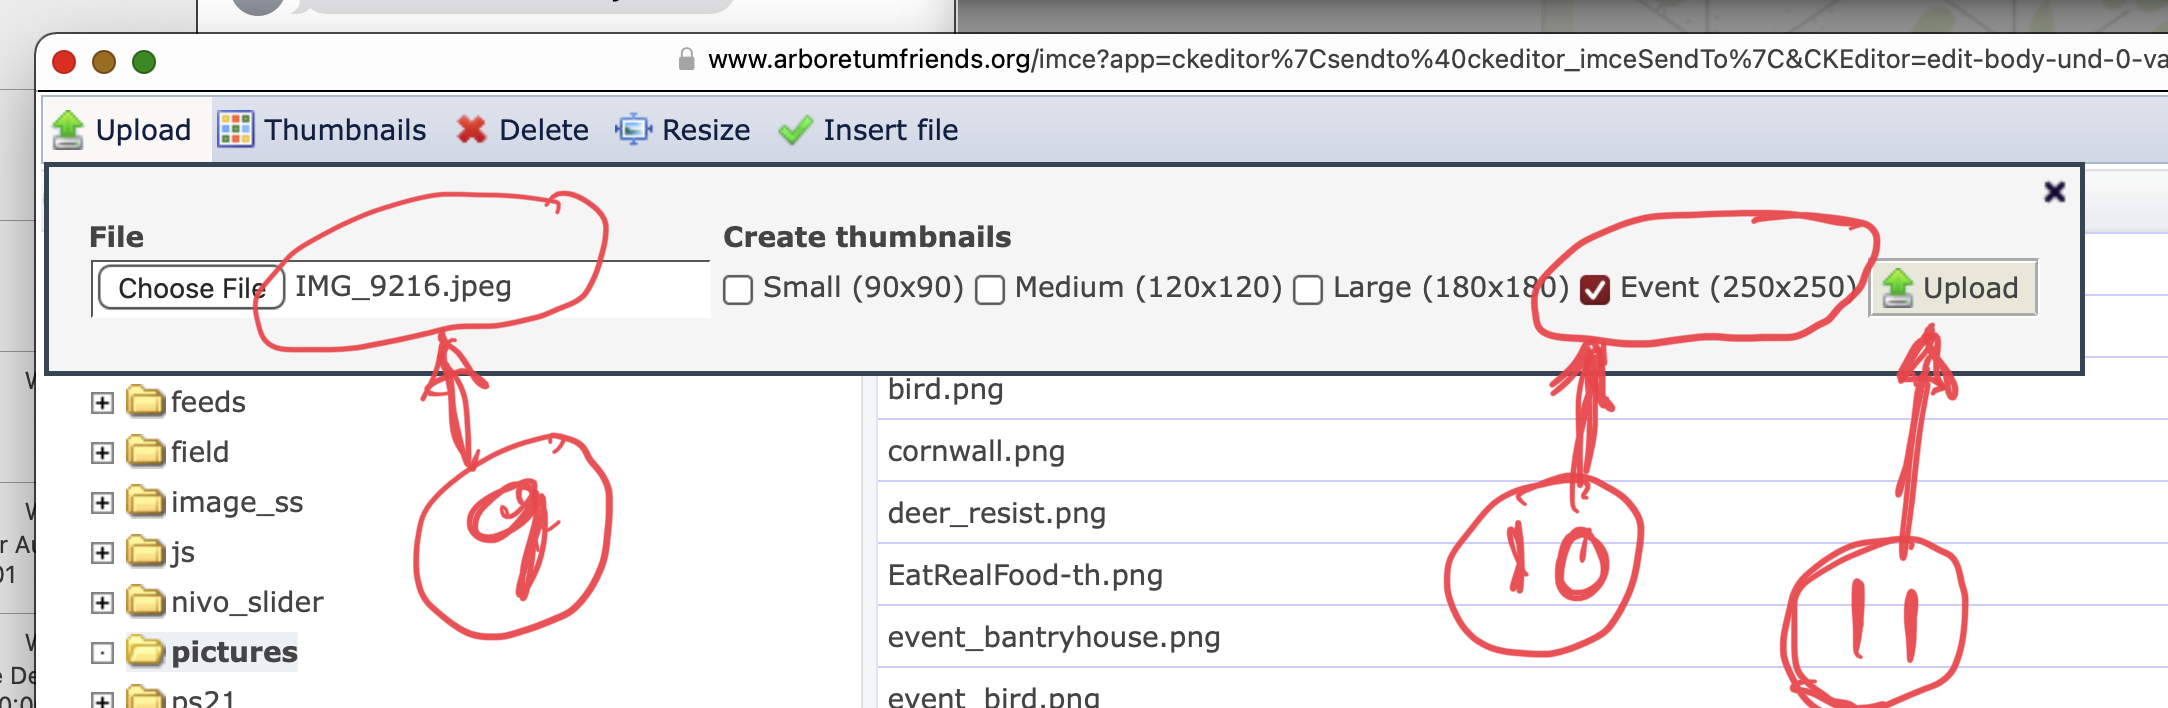
Note the name of the file you chose is in the window (#9). Check the Event (250×250) box (#10) and then click “Upload (#11). This uploads the image plus a resized copy (250×250 pixels) to the server.


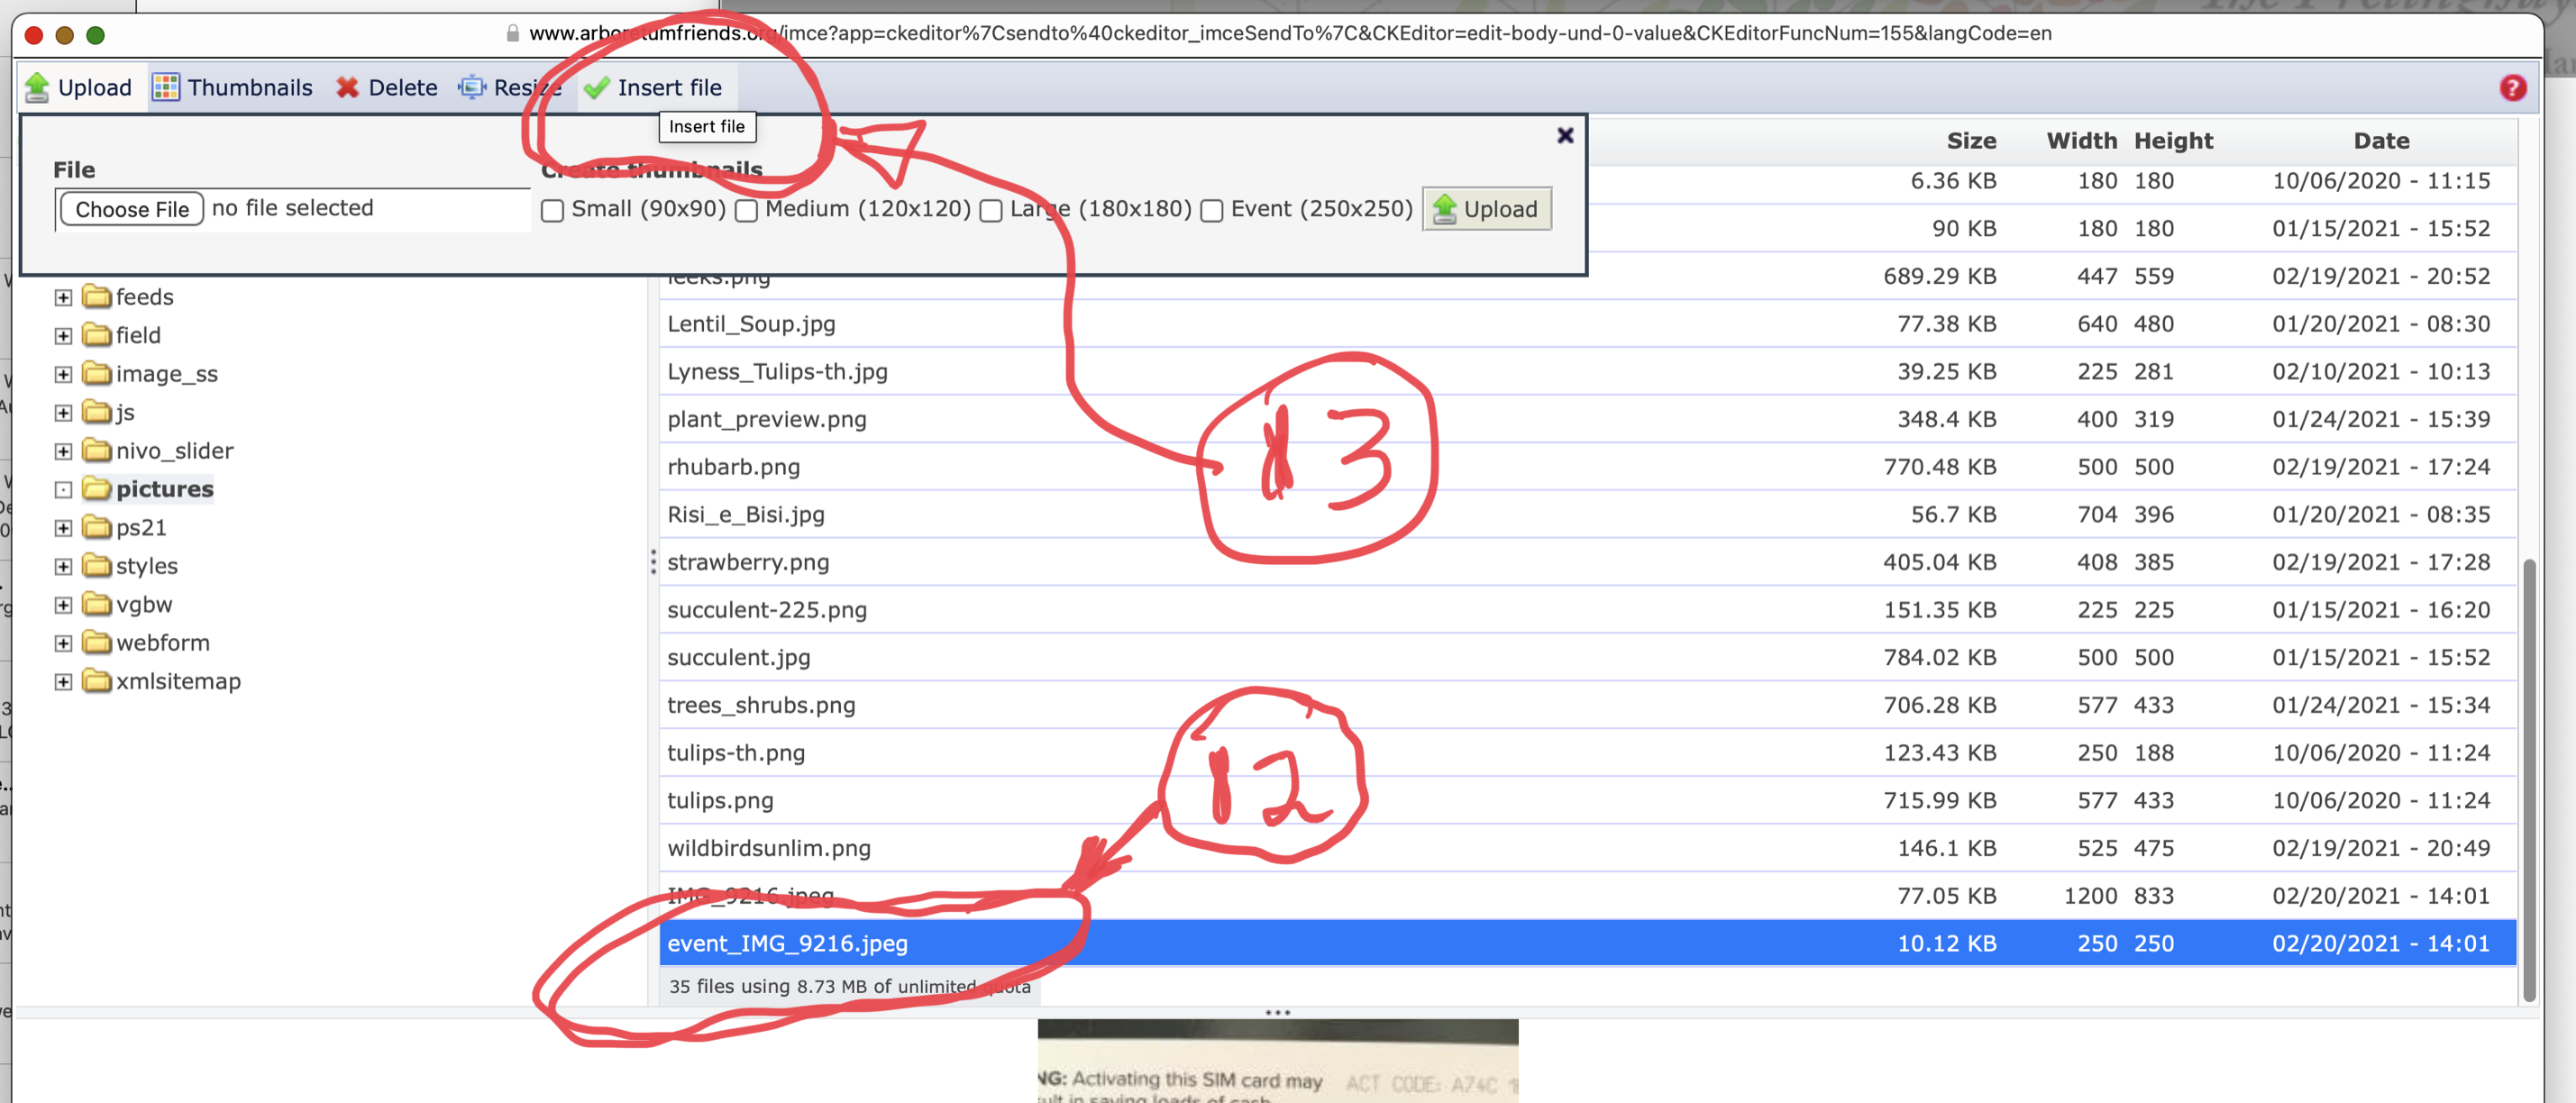
The file list now shows 2 versions of the file, the original you uploaded plus the resized version with “Event_” inserted at the beginning of the original name. Select the “Event_filename.jpg” (#12) and then click “Insert file” (#13).


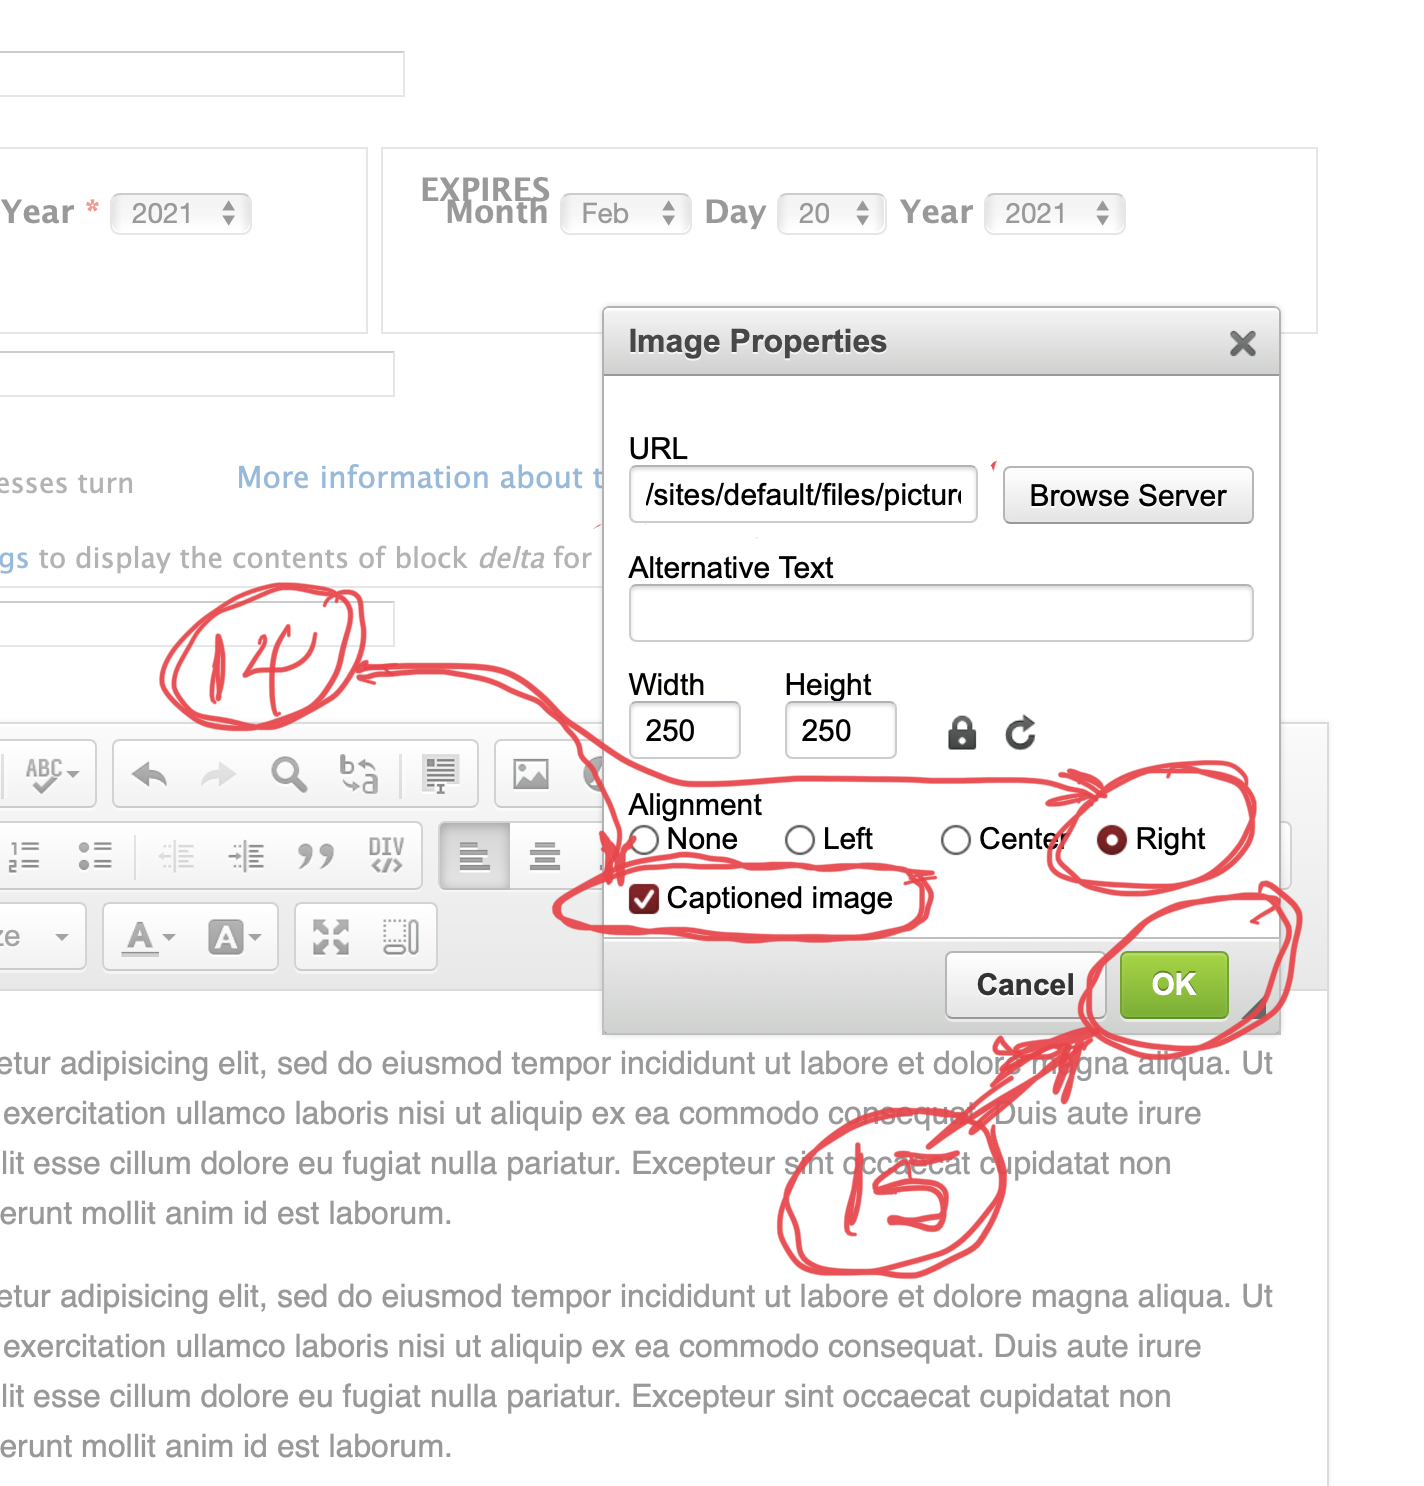
Now we are back to the Image Properties window from several steps ago, but now the URL is filled in as are the Width and Height. Check the “Alignment Right” and “Captioned image” boxes (#14) and then click “OK” (#15).


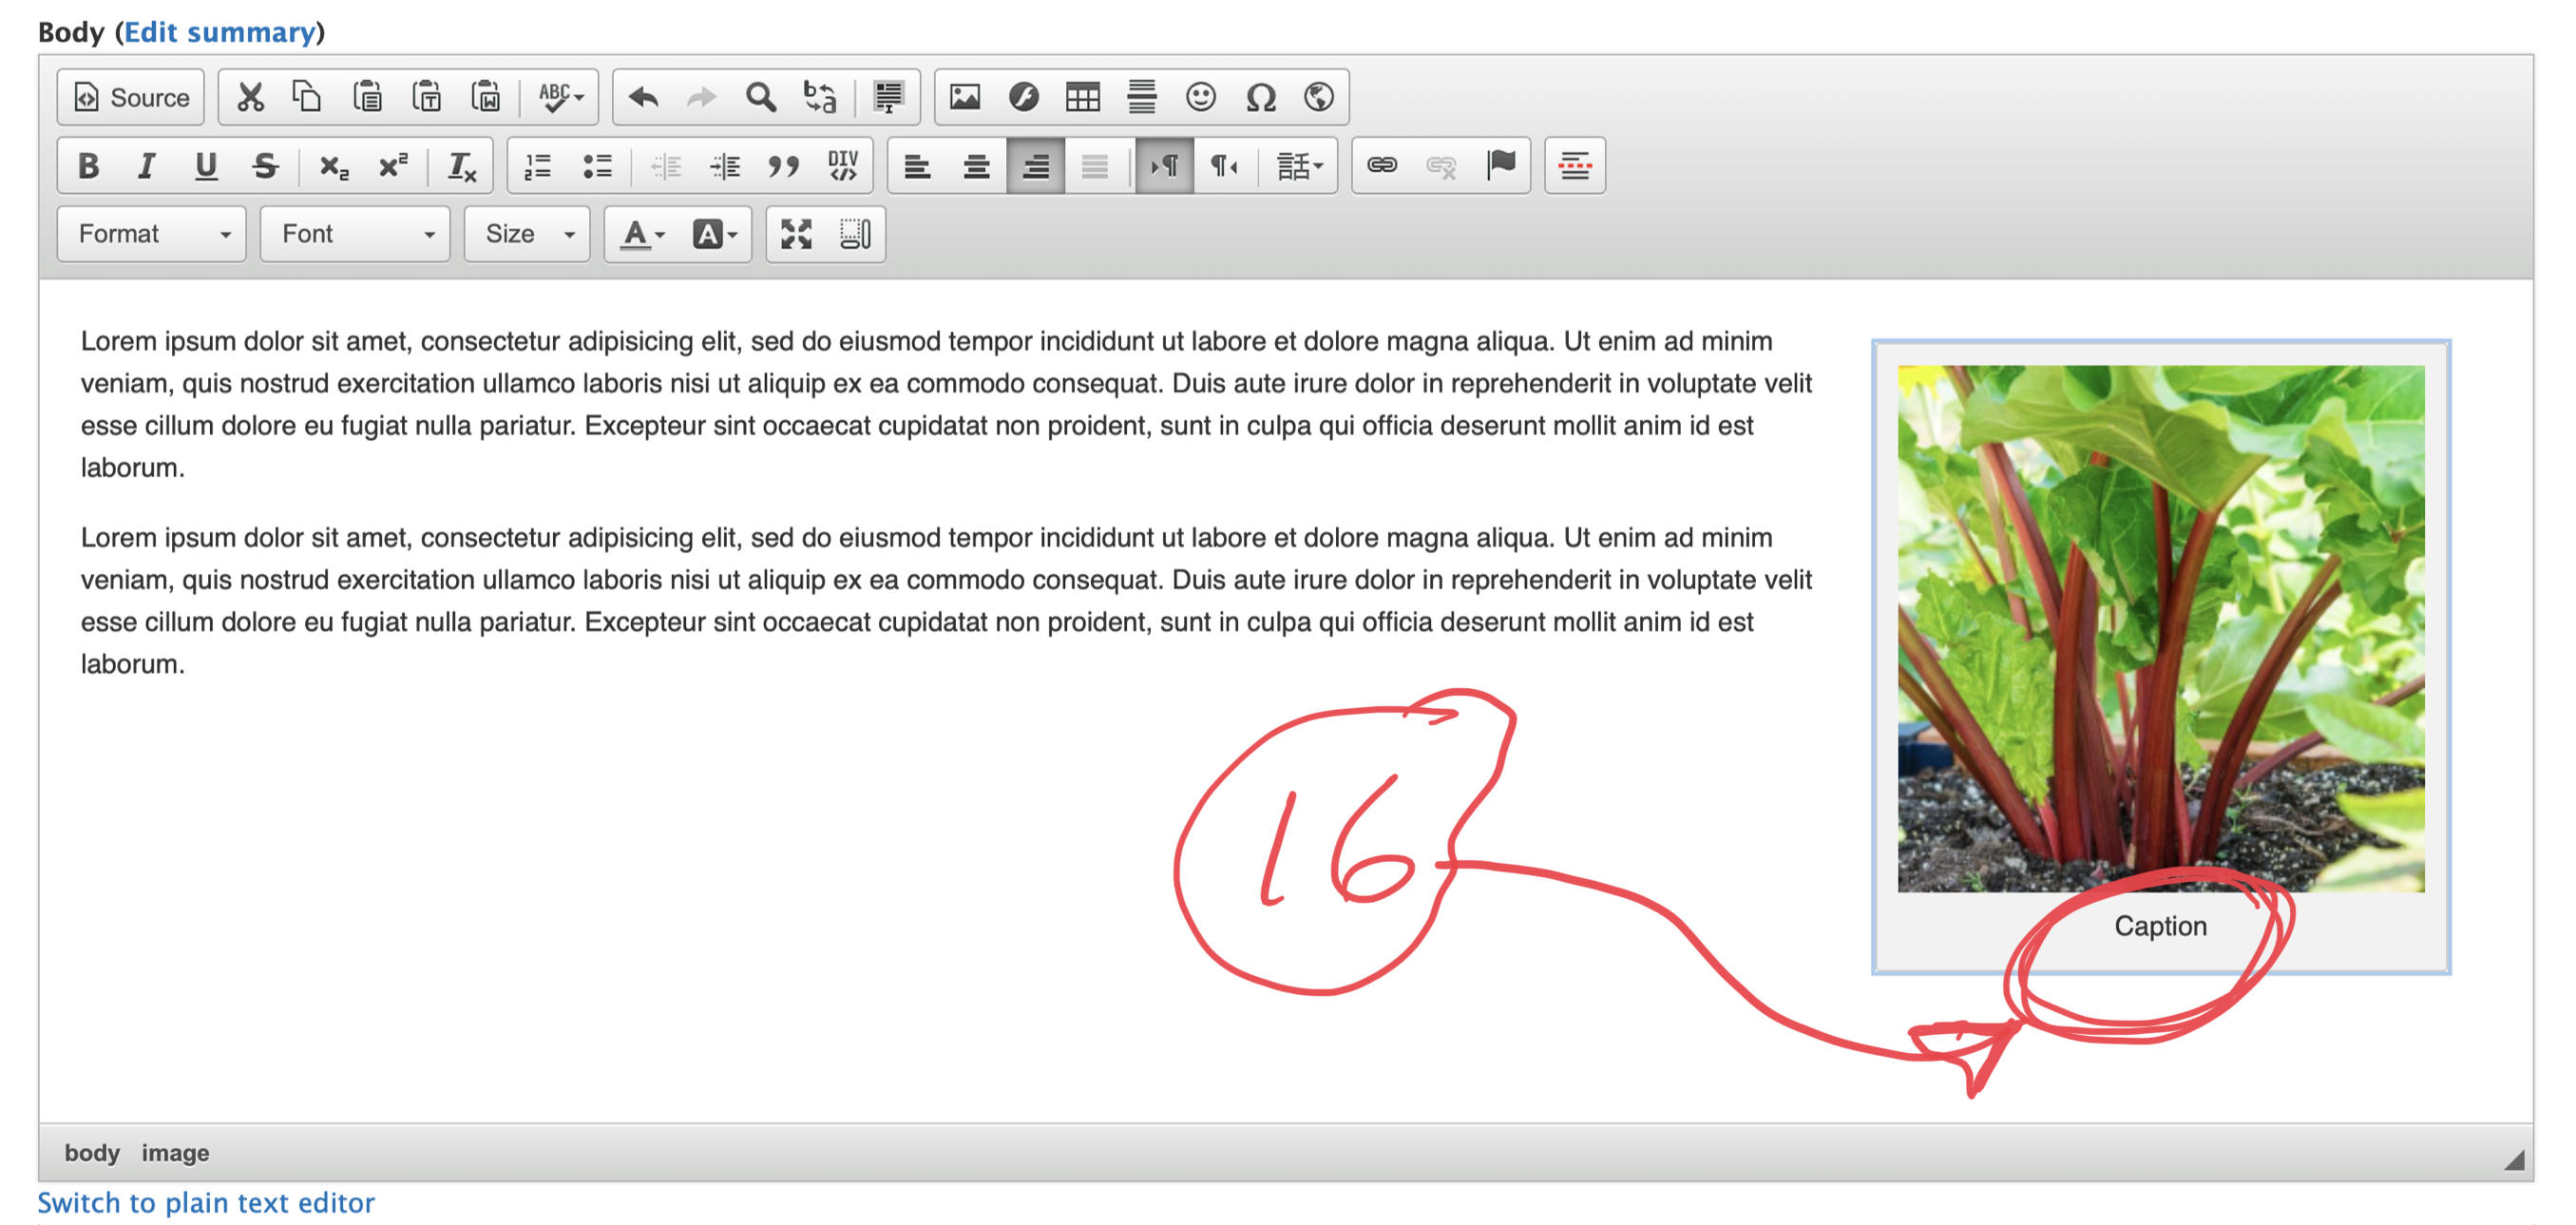
And here we are back in the with our image inserted. One more step, though. Either add a new caption to the image or delete the word caption (#16). 

DON’T FORGET TO SAVE!


And here is the finished product. Note the space between the image and the text.


Virtual Gingerbread (VGBW) Help

Virtual Gingerbread Overview

Virtual Gingerbread 2020 is implemented on the Friends’ website through the following:

  • Entry Form – available to the public at this url: https://www.arboretumfriends.org//node/add/vgbw-entry. An entrant fills out the form and saves it on line. It is added to the sit’s database, with the OKd field set to “No”.
  • All the forms may be seen by Editors or Admins using one of the Admin views (see below), but only forms with the OKd field set to “Yes” will be visible on the Public views.
  • Website editors or admins may edit the Entry Forms and OK them.
  • At the appropriate time, the public will be invited to view and vote on entries using the Public Voting view.
  • An Admin View is available that will allow downloading a csv file of data from all the entries.

How to OK or Edit an Entry

  • Log in on website
  • Use VGBW-Admin by OKd view – this is sorted with Not OKd at the top.
  • Click on title of the entry you want to OK or Edit.
  • Click on Edit
    • Make sure the selfie image is in the 4th position, since the Public display view shows only the first 3 images.
      • If necessary, change order using Row Weights
      • First, click on “Show row weights” above first image.
      • Then, change the selfie’s weight to 4 (that will move it to 4th position when you save).
    • Edit other fields as necessary
    • Click OKd: Yes
    • Click Save
    • The entry should now be visible in the VGBW-Public views.

Virtual Gingerbread Views

There are 5 views:

  • 3 Admin views accessible only by logged in users with Role of Editor or Administrator:.
    • Admin – by Date – All entries, sorted in descending order of date created.
    • Admin – by OKd – All entries, sorted 1st descending by OKd, 2nd descending by date created
    • VGBW CSV Export – exports csv file of all entries
  • 2 Public views:
    • Public – no voting buttons – Only OKd and Published entries
    • Public – with voting buttons (under development) – Only OKd and Published entries, but including Voting Buttons

Editing Events

  1. Setting “Filled” or “Cancelled” signs on existing Events
    Log in
    Click on “EventsDev-Fut” at top left or on “EventsDev-Future” in WebDev Links in right sidebar.
    Scroll to event you wish to change.
    Click “Edit” button at end of title line. This opens the edit window for the selected event.
    Scroll down to the “Status” buttons. Probably the “Active” button shows selected (black dot next to it). Click on “Filled” or “Cancelled.” The black dot will then appear next to your selection.
    Scroll to the bottom of the form and click the “Save” button.
    Click on “EventsDev-Fut” at top left and navigate to the event you changed to confirm that the “Filled” or “Cancelled” sign is posted and the registration buttons have disappeared.
    Editing information about an event.
    Log in
    Click on “EventsDev-Fut” at top left or on “EventsDev-Future” in WebDev Links in right sidebar.
    Scroll to event you wish to change.
    Click “Edit” button at end of title line. This opens the edit window for the selected event.
    Change the information you want to update, e.g., times, description, other information, etc.
    Scroll to the bottom of the form and click the “Save” button.
    Click on “EventsDev-Fut” at top left and navigate to the event you changed to confirm that the changes were made.
    12/21/15
  2.  


Plant Sale Page Updates

  1. Log in to website
  2. Plant Sale Page
    1. URL: https://www.arboretumfriends.org//plantsale
    2. Page logic is to display articles (blog entries) with the tag “PS-18” (no quotes) in reverse order entered, i.e., latest on top.
    3. You can, however, make an article “sticky” which means it will stay at the top. We have done that In the past with an article largely based on your entry in the Spring Arboretum Leaves. I have done that already for you, but you can modify it by following the Edit Article instructions below.
  3. Enter New Articles
    1. After you log in, you will get a new menu on top that includes “Add Article.” Click on that to open the editor.
    2. Give your blog entry a nice title.
    3. Enter and format the body of the article in the Body section.
    4. Be sure to add the tag “PS-18” (no quotes) or the article will not show up on the plant sale page.
    5. Click the Save button at the bottom of the editor screen.
    6. The new blog entry should now be visible on the Plant Sale Page.
  4. Edit an Existing Article
    1. Click on the title of the article you wish to modify.
    2. On the next screen, click on Edit. That will open the article in the editor.
    3. Make the desired changes in the article.
    4. Click the Save button at the bottom of the editor screen.
    5. The modified article should now be visible on the Plant Sale Page.
  5. Insert a thumb image in an article
    1. Add text to new article.
    2. Put cursor at beginning of paragraph where you want to insert image.
    3. Click image icon in top row of WYSIWYG editor.
    4. Navigate: Browse Server | Upload | Choose File and click on image file you want to upload from your computer, then the Open button.
    5. Check the Create thumbnails – Large box, then the Upload button. This uploads the image from your computer to the server and at the same time creates a 180×180 pixel thumbnail image. The thumbnail uses the same file name prefixed with “Large_”.
    6. Click on the thumbnail name and then the Insert file button at the top.
    7. This returns you to the image properties popup. Click on the Alignment – Right button and the “Captioned Image” box, then the OK button.
    8. Your thumbnail should appear right aligned in the editor.
    9. Edit the caption to your desired text.
    10. Save the article.
  6. To link thumb image to its full-sized sibling:
    1. Navigate to article
    2. Click on Edit button at top. This opens the WYSIWYG editor screen.
    3. Make sure Text format is set to “Full HTML”
    4. Click on image, then click on Image editing icon in top row of WYSIWYG editor.
    5. Select all of the path in the URL box. Copy it (CMD-C).
    6. Close the Image Properties popup using the Cancel button.
    7. Click on Link tab.
    8. Paste the URL into the URL box. Delete the “large_” that prefixes your image file name.
    9. Set the Target to “New Window (_blank)”.
    10. Click OK.
    11. Save article.
    12. Test the link by clicking on the image. It should open a new tab on your browser showing the full-sized image.

12/14/18


Slider Items – Publish & Unpublish

Publish & Unpublish Slider Items

This describes how to add and remove the slider items that appear on the Home page of the website.

Publish a Slider Item

  1. Log in to the website.
  2. Add a new event if necessary.
  3. Navigate to the event in EventsDev-Future view and note the event number (in parenthesis at end of title).
  4. Create a 400px x 400px image for the slider and note its location on your computer.
  5. Click the “Add Slider” button in the right sidebar.
  6. Add a title — this becomes the image caption in the slider.
  7. Click the “Add Image” button and navigate to the location of the 400×400 image on your computer. Select it and upload it.
  8. Add the URL of the event you wish the image to be linked to. This will be of the form: https://www.arboretumfriends.org//Events#NNNNN where NNNNN is the event number you found in the earlier step. Don’t omit the pound sign — the link won’t work without it.
  9. Set the Publish / Unpublished dates and times
    1. Leave Publish date / time blank if you are going to publish it immediately
  10. Set Publish Yes to publish it immediately.
  11. Press “Save”. The Slider is now active.

Unpublish a Slider Item

  1. Log in to website.
  2. Click on “Content” in black menu bar at top of page.
  3. Set Type to “nivo_slider” and Published to “Yes” then click Apply.
  4. The content list will show you the currently published slider items.
  5. Check the box at left of the item (or items) you want to unpublish. Do this by clicking the box.
  6. Set Operations to “Unpublish”
  7. Click Execute button. The item is unpublished and no longer appears on the Home Page.

Photo Gallery Instructions

  1. Log in to website. You need permissions of “Photo Editor” or above to perform the next steps.
  2. Prepare your photos
    1. You may use png, gif, jpg or jpeg files.
    2. Make sure the images have been resized so the short edge is no more than 1300 pixels.
    3. Save the resized images in an easily-found folder on your computer.
  3. Navigate to Photo Gallery page.
  4. Click on “Add image-gallery” link in right-sidebar.
  5. On the “Create Image Gallery” form:
    1. Add a title
    2. Add body text. The editor will allow you to apply formatting as desired.
    3. In the add new files box on the right,
      1. Click “Browse” and browse to the folder in step 2.3, above and select the photos you want to add.
      2. Click “Upload”
        1. Note the 8 Mb upload limitation. You may have to do multiple uploads if you have a lot of files or if you didn’t shrink them sufficiently.
      3. Thumbnails of all the images should appear in a column on the right.
      4. You can drag images into a different sequence if desired.
      5. You can add a title to each image by typing into the Title box associated with each image.
    4. When ready, click the “Save” button on the bottom left of the form.
    5. Return to the Photo Gallery (click on PhotoGallery menu item at top) and see your new gallery at the top of the page. These are arranged in descending order by date created.
    6. You can edit an individual image gallery by clicking its title, then the “Edit” tab and modifying the text, rearranging the images, adding images, etc.
      1. Remember to click the “Save” button when done.

3/14/18

Log In / Log Out

  1. How to Log In
    1. Go to http://www.arboretumfriends.org/user
    2. Enter username and password (separate email).
    3. If successful, will get new 2-line menu at top. Note your username and “Log out” button at right end of new menu.
    4. Also, you will get several new links in right sidebar (see “WebDev Links”)
  2. How to Log out
    1. Click on log out button at right end to top black menu bar.
    2. Alternative log out method: go to http://www.arboretumfriends.org/user/logout

12/21/15